scispace - formally typeset
Search or ask a question
Journal ArticleDOI

3-D Isotropic Tactile Microprobe Based on a Silicon Parallelogram Kinematic: From Concept to Fabrication

TL;DR: In this paper, a tactile microprobe based on a parallelogram kinematic made from monocrystalline silicon is presented, which is optimized to allow very compact integration into a O11 mm housing.
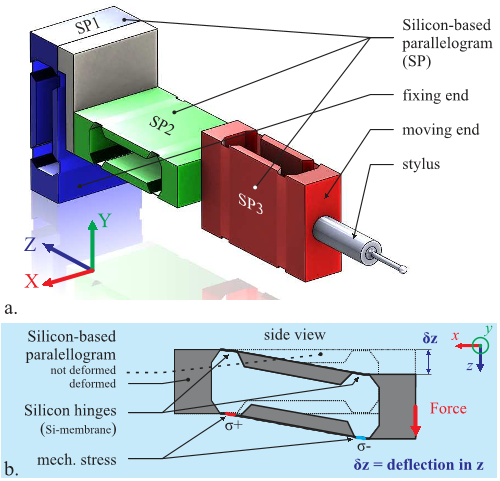
Abstract: This paper reports on a unique tactile microprobe based on a parallelogram kinematic made from monocrystalline silicon. This kinematic, made out of an orthogonal cascade assembly of three identical parallelograms, provides an isotropic behavior to the microprobe. Each parallelogram deflects in only one direction thanks to thin elastic silicon membrane hinges and their displacements are recognized using piezoresistors integrated into these hinges. Wide deflection ranges, isotropic behavior, and low mechanical stiffness of the new microprobe, as predicted by simulations, could be verified in experiments. The fabrication, the assembly, and the contacting of the first microprobe prototype was optimized to allow very compact integration into a O11 mm housing. This make it suitable for metrology research laboratories and industries equipped with conventional coordinate measurement machines and even for a variety of other 3-D force/displacement measurements. [2018-0157]
Figures (21)

Content maybe subject to copyright    Report

Citations
More filters
Journal ArticleDOI
TL;DR: In this paper , the surface-sensing principles of micro-probe systems were the focus, and the characteristics were reviewed, including the performance trends of individual microprobe system with different sensing principles.
Abstract: Micro-coordinate measuring machines (micro-CMMs) for measuring microcomponents require a probe system with a probe tip diameter of several tens to several hundreds of micrometers. Scale effects work for such a small probe tip, i.e., the probe tip tends to stick on the measurement surface via surface adhesion forces. These surface adhesion forces significantly deteriorate probing resolution or repeatability. Therefore, to realize micro-CMMs, many researchers have proposed microprobe systems that use various surface-sensing principles compared with conventional CMM probes. In this review, the surface-sensing principles of microprobe systems were the focus, and the characteristics were reviewed. First, the proposed microprobe systems were summarized, and the probe performance trends were identified. Then, the individual microprobe system with different sensing principles was described to clarify the performance of each sensing principle. By comprehensively summarizing multiple types of probe systems and discussing their characteristics, this study contributed to identifying the performance limitations of the proposed micro-probe system. Accordingly, the future development of micro-CMMs probes is discussed.

12 citations

Journal ArticleDOI
TL;DR: In this article, the IMT-PTB microprobe is combined with a uniquely designed microenvironment, which facilitates and improves the measurement of workpieces with submillimeter features.
Abstract: This paper describes the experimental verification of the novel IMT-PTB microprobe combined with a uniquely designed microenvironment. The microprobe consists of three silicon-based parallelograms stacked orthogonally, which leads to high isotropy. The probe tip deflections are detected in 3D with the help of piezoresistors placed in the parallelograms. The microenvironment facilitates and improves the measurement of workpieces with submillimeter features. The new microprobe and the microenvironment were integrated into a commercial coordinate measuring machine (CMM). To evaluate the microprobe performance, PTB produced and calibrated three reference objects: a cube, a sphere, and a microgear measurement standard. The differences between the calibration values and the measurement results obtained by the microprobe were in the sub-micrometer range. Furthermore, the microprobe was compared with the standard probing system of the gear measuring machine by measuring the reference objects with identical parameters. The results show the excellent performance of the micro probing system, thereby extending the capability of the CMM for high-precision measurements of complex workpieces at the microscale.

8 citations


Cites background or methods from "3-D Isotropic Tactile Microprobe Ba..."

  • ...With the goal to facilitate this integration, a novel silicon microprobe based on a parallelogram design has been developed, presented [36, 37] and patented [38]....

    [...]

  • ...Finally, the cells and IPs were glued together in an aluminum machined special tool presented in [37]....

    [...]

  • ...27% was reported in [37] for a range of ±200 μm on X , Y , and +200 μm on Z ....

    [...]

  • ...The voltage was transmitted to each cell using pass-through tracks on the IPs and those on the front of the cells....

    [...]

  • ...To complete the assembly, all tracks of the cells were hand-soldered to one of the IPs [37]....

    [...]

Journal ArticleDOI
TL;DR: In this article , a flexible capacitive tactile sensing array that incorporates a porous dielectric layer with micro-patterned structures on the surface to enable the sensitive detection of normal and shear pressures was presented.
Abstract: The development of pressure sensors of high sensitivity and stable robustness over a broad range is indispensable for the future progress of electronic skin applicable to the detection of normal and shear pressures of various dynamic human motions. Herein, we present a flexible capacitive tactile sensing array that incorporates a porous dielectric layer with micro-patterned structures on the surface to enable the sensitive detection of normal and shear pressures. The proposed sensing array showed great pressure-sensing performance in the experiments, with a broad sensing range from several kPa to 150 kPa of normal pressure and 20 kPa of shear pressure. Sensitivities of 0.54%/kPa at 10 kPa and below, 0.45%/kPa between 10 kPa and 80 kPa, and 0.12%/kPa at 80 kPa and above were achieved for normal pressures. Meanwhile, for shear pressures, sensitivities up to 1.14%/kPa and 1.08%/kPa in x and y directions, respectively, and below 10 kPa, 0.73%/kPa, and 0.75%/kPa under shear pressure over 10 kPa were also validated. The performance of the finger-attached sensing array was also demonstrated, demonstrating which was a potential electronic skin to use in all kinds of wearable devices, including prosthetic hands, surgical robots, and other pressure monitoring systems.
3 citations

Journal ArticleDOI
TL;DR: In this article , a two-step plus hinge stylus with a diameter less than a few micrometers was proposed to improve sensitivity and vibration characteristics of the stylus tip.
Abstract: In recent years, there has been an increasing demand for measuring a small hole with a diameter of 10 μm or less. Many micro coordinate measuring machines (micro CMMs) have been developed so far. However, as the diameters of these probes decrease below 10 μm, the rigidity of the probe decreases, making it difficult to detect contact between the stylus tip and the measured surface. For the same reason, the stylus with large aspect ratios cannot be used. Therefore, we have been developing a measurement system using an optical fiber as a stylus to measure microstructures with low measurement force. In this research, we proposed the two-step plus hinge stylus with a diameter less than a few μm to improve sensitivity and vibration characteristics. The design parameters of the stylus were simulated by the finite element method, and the results of the actual examination are summarized as follows. The simulation results using the finite element method indicate that the contact sensitivity was improved from 17% for the standard stylus to 37% for the two-step plus hinge stylus. The experimental results indicate that the contact sensitivity was improved from 17% for the standard stylus to 35% for the two-step plus hinge stylus. The results of the stylus stability evaluation experiment showed that the maximum fluctuation of the standard stylus is approximately 1 μm, and that of the two-step plus hinge stylus is approximately 0.05 μm, which confirms that the use of a two-step plus hinge stylus can improve vibration characteristics. The performance of this stylus was evaluated by measuring the micro hole with a diameter of 7 μm. The repeatability of each measurement point was approximately 50 nm.

1 citations

Proceedings ArticleDOI
23 Jun 2019
TL;DR: In this paper, a fully functional silicon-based microprobe consisting of three identical measuring cells mounted orthogonally has been developed, each offering a large measuring range and low stiffness in only one direction thanks to a silicon parallelogram structure.
Abstract: A fully-functional silicon-based microprobe consisting of three identical measuring cells mounted orthogonally has been developed. The microfabricated measuring cells act as miniaturized load cells, each offering a large measuring range and low stiffness in only one direction thanks to a silicon parallelogram structure. The microassembly of three parallelogram structures using interposers results in an isotropic 3D kinematic microprobe. Piezoresistive sensing provides sub-micrometer accuracy. Highly reproducible and reliable manufacturing processes such as anodic bonding were recently introduced to build the measuring cell. In addition to the standard mechanical and electrical characterization of the microprobe, a dynamic characterization was performed. It was demonstrated that the new microprobe can be used in a commercial coordinate measuring machine (CMM) thereby extending its applicability for dimensional measurement of microcomponents.

1 citations


Cites background or methods from "3-D Isotropic Tactile Microprobe Ba..."

  • ...In addition to a characterization already given in [6], the frequency response of the measuring cell and of the microprobe is detailed....

    [...]

  • ...Table 1: Properties of isotropic microprobe [6, 10]....

    [...]

  • ...In previous work [6, 10], the properties of the single (glued) measuring cells and the 3D microprobe were described in detail....

    [...]

  • ...In contrast to earlier concepts, adhesive bonding [6] is replaced by the more reproducible and reliable anodic bonding of two silicon wafers using a structured intermediate glass substrate....

    [...]

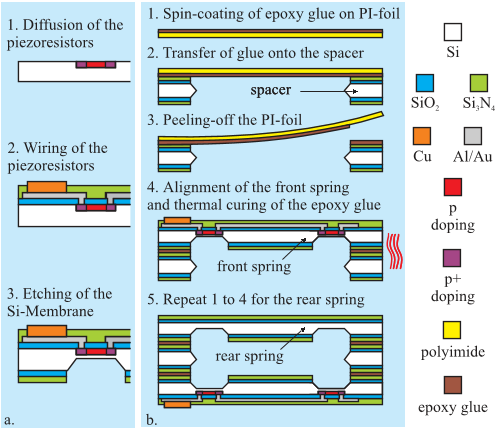
  • ...A thin polyimide film coated with epoxy adhesive was used to transfer the adhesive on the surfaces to bond [6, 10]....

    [...]

References
More filters
Proceedings ArticleDOI
01 Jun 2017
TL;DR: In this paper, a micro probing system composed of three silicon parallelogram linkages is developed for the use in dimensional metrology, which is assured by elastic silicon hinge and allows displacement in only one direction.
Abstract: For the use in dimensional metrology a novel micro probing system composed of three silicon parallelogram linkages was developed. The parallelogram structure is assured by elastic silicon hinge and allows displacement in only one direction. For each parallelogram the displacement is evaluate using piezo-resistors integrated in the silicon hinges. Wide deflection ranges, isotropic behavior and low mechanical stiffness as predicted by simulations could be verified in experiments. With this combination of characteristics the micro probing system is an ideal sensor for the use in all conventional CMMs but also for many other 3D force/displacement measurement tasks.

6 citations


"3-D Isotropic Tactile Microprobe Ba..." refers background in this paper

  • ...RECENTLY, we reported on a radically new microprobe design based on silicon parallelograms [1], which in essence are miniaturized versions of classical double bending beam load cells [2]–[4]....

    [...]

Journal ArticleDOI
TL;DR: In this paper, a piezoresistive microprobe based on silicon is presented, which can be tailored to provide a range of anisotropy or even a perfect isotropy.
Abstract: Different kinds of piezoresistive microprobes based on silicon have been developed to enable measurement with high accuracies. However, the typical mechanical anisotropy of such systems leads to the slip of the tip, when probing inclined surfaces. Here, a novel microprobe design is presented, which can be tailored to provide a range of anisotropy or even a perfect isotropy. In the first approach, the microprobe is composed of two stacked silicon membranes. In the second approach, a stainless steel suspension in the form of a laser structured foil is stacked on a silicon membrane. Geometrical parameter studies were carried out by mechanical FEM simulations to determine their influence on the stiffnesses in all spatial directions and to predict anisotropies. Microsystems with selected geometries were fabricated and stacking was obtained through selective adhesive transfer and bonding on a wafer level. Prototypes with anisotropies between 3 and 0.4 were characterized confirming the simulations.

5 citations


"3-D Isotropic Tactile Microprobe Ba..." refers background or methods or result in this paper

  • ...3) Parameter Variation Study: In a similar manner as in a previous work on different microprobe designs [26], parameter variation studies were carried out in Ansys using the...

    [...]

  • ...A silicon-membrane-based microprobe has been developed at the Technische Universität Braunschweig (TUBS) in cooperation with the PTB [18]–[26]....

    [...]

  • ...level processing was very similar to the one for the silicon membrane based microprobe of earlier works [22], [26]....

    [...]

  • ...The use of such SP in a 3DSP would expand the operation range for more than four times against silicon membrane based microprobes reported so far [15], [22], [25], [26]....

    [...]

  • ...Some work has been dedicated to obtaining isotropic mechanics, which could not be achieved without increasing the stiffness and further reducing the maximum deflections of the system [16], [25], [26]....

    [...]

Proceedings ArticleDOI
01 Oct 2012
TL;DR: In this article, a new measuring principle based on interferometry is developed to further reduce the measurement uncertainties better than a micrometer by combining classical tactile measurement with optical read out.
Abstract: Increasing manufacturing accuracy requirements enforce the development of innovative and highly sensitive measuring tools. Fiber probes combine classical tactile measurement with optical read out. These probes allow extremely small contact force and reach measurement uncertainties better than a micrometer. To even further reduce these values, a new measuring principle based on interferometry is being developed.

4 citations

Journal ArticleDOI
TL;DR: This work aims to extend the capabilities of conventional coordinate measuring machines (CMMs) towards measuring microgeometries through the low-cost integration of a tactile microprobe, a recently developed silicon-membrane-based microprobes.
Abstract: Various microprobes have been developed in the last decade to address the needs of micrometrology. However, most microprobes are only employed in specialized measuring machines located in a few research institutes and are not widespread in the industry. This work aims to extend the capabilities of conventional coordinate measuring machines (CMMs) towards measuring microgeometries through the low-cost integration of a tactile microprobe. In order to demonstrate this, a gear measuring instrument (GMI), which is a commercial CMM not specialized for measurements at the microscale, has been equipped with a recently developed silicon-membrane-based microprobe. In the first part of this work, the working principle of the microprobe, its assembly and its integration into the GMI are described. Two different mounting setups of the microprobe onto the GMI were evaluated and tested. Measurements on the GMI were performed solely with the microprobe or by combining the microprobe and the measurement system already present on the GMI. This combination makes it possible to use the microprobe advantageously and to exchange it in a comfortable semi-automatic way. To test these two mounting setups, a new involute scanning artifact (SAFT) with superimposed waviness was measured.

3 citations


"3-D Isotropic Tactile Microprobe Ba..." refers result in this paper

  • ...4) Towards Industrial Application: In ongoing research in collaboration with the PTB, the integration of the microprobe in a conventional CMM is investigated with the patended new design [55] in an approach, which is similar to the one reported earlier with other probe designs [23], [56]....

    [...]

Frequently Asked Questions (1)
Q1. What are the contributions in this paper?

This work reports on a unique tactile microprobe based on a parallelogram kinematic made from monocrystalline silicon. This kinematic, made out of an orthogonal cascade assembly of three identical parallelograms, provides an isotropic behavior to the microprobe. This make it suitable for metrology research laboratories as well as industries equipped with conventional coordinate measurement machines and even for a variety of other 3D force/displacement measurements.