scispace - formally typeset
Search or ask a question
Journal ArticleDOI

Finite element analysis of residual stresses in machining

TL;DR: In this paper, an advanced approach to model heat transfer phenomena at the tool-chip interface was included in the numerical simulation, and the FEM results were compared with some experimental data obtained turning AISI 1045 steel using uncoated WC tool.
Abstract: Residual stresses play an important role in the service quality of a component. Therefore, it is essential to predict and control residual stresses on the machined surface and subsurface. The paper is focused on the numerical prediction of residual stresses in the orthogonal cutting process of a mild steel. An advanced approach to model heat transfer phenomena at the tool-chip interface was included in the numerical simulation. The FEM results were compared with some experimental data obtained turning AISI 1045 steel using uncoated WC tool.

Summary (2 min read)

1 INTRODUCTION

  • The machining process provokes a residual stress in the surface layer.
  • The residual stresses on the machining surface are an important factor in determining the performance and fatigue strength of components.
  • They plays an important role in the service quality of a component.
  • The paper is focused on the numerical prediction of residual stresses in the orthogonal cutting process of a mild steel.
  • An advanced approach to model heat transfer phenomena at the tool-chip interface was included in the numerical simulation.

2 THERMAL ASPECTS IN MACHINING

  • There is still a relevant lack of knowledge which remarkably limits their successful application to the design of cutting processes.
  • The most relevant criticisms involve material characterization for strain, strain rate, material hardness and temperature conditions typical of machining, friction data at the tool/part interface, chip formation and heat transfer conditions.
  • First of all, numerical simulation is based on a mixed updated Lagrangian – Eulerian approach.
  • Furthermore, heat transfer at the tool-chip interface is taken into account by means of a global heat transfer coefficient at the tool-chip interface, which is function of the cutting parameters of the process.
  • The details of the entire procedure will be illustrated in the next paragraph.

3.1 EXPERIMENTAL TESTS

  • The proposed approach was applied to the prediction of the residual stresses in orthogonal cutting.
  • The validity of the entire procedure was verified by comparing numerical and experimental results taken from literature [11].
  • In [11] some AISI 1045 steel disks were dry machined orthogonally with uncoated carbide tools, using four different cutting edge radii and three different feeds.
  • The two components of the cutting force, namely the feed (Ft) and the cutting forces (Fc), were measured using a KISTLER 9121 three-component tool dynamometer.

3.2.1 Set-up and verification of the numerical model

  • As far as numerical simulations are concerned, the SFTC Deform-2D code was utilized.
  • As concerns friction, a simple model based on the constant shear hypothesis (τ=mτ0) was implemented, setting m=0.82.
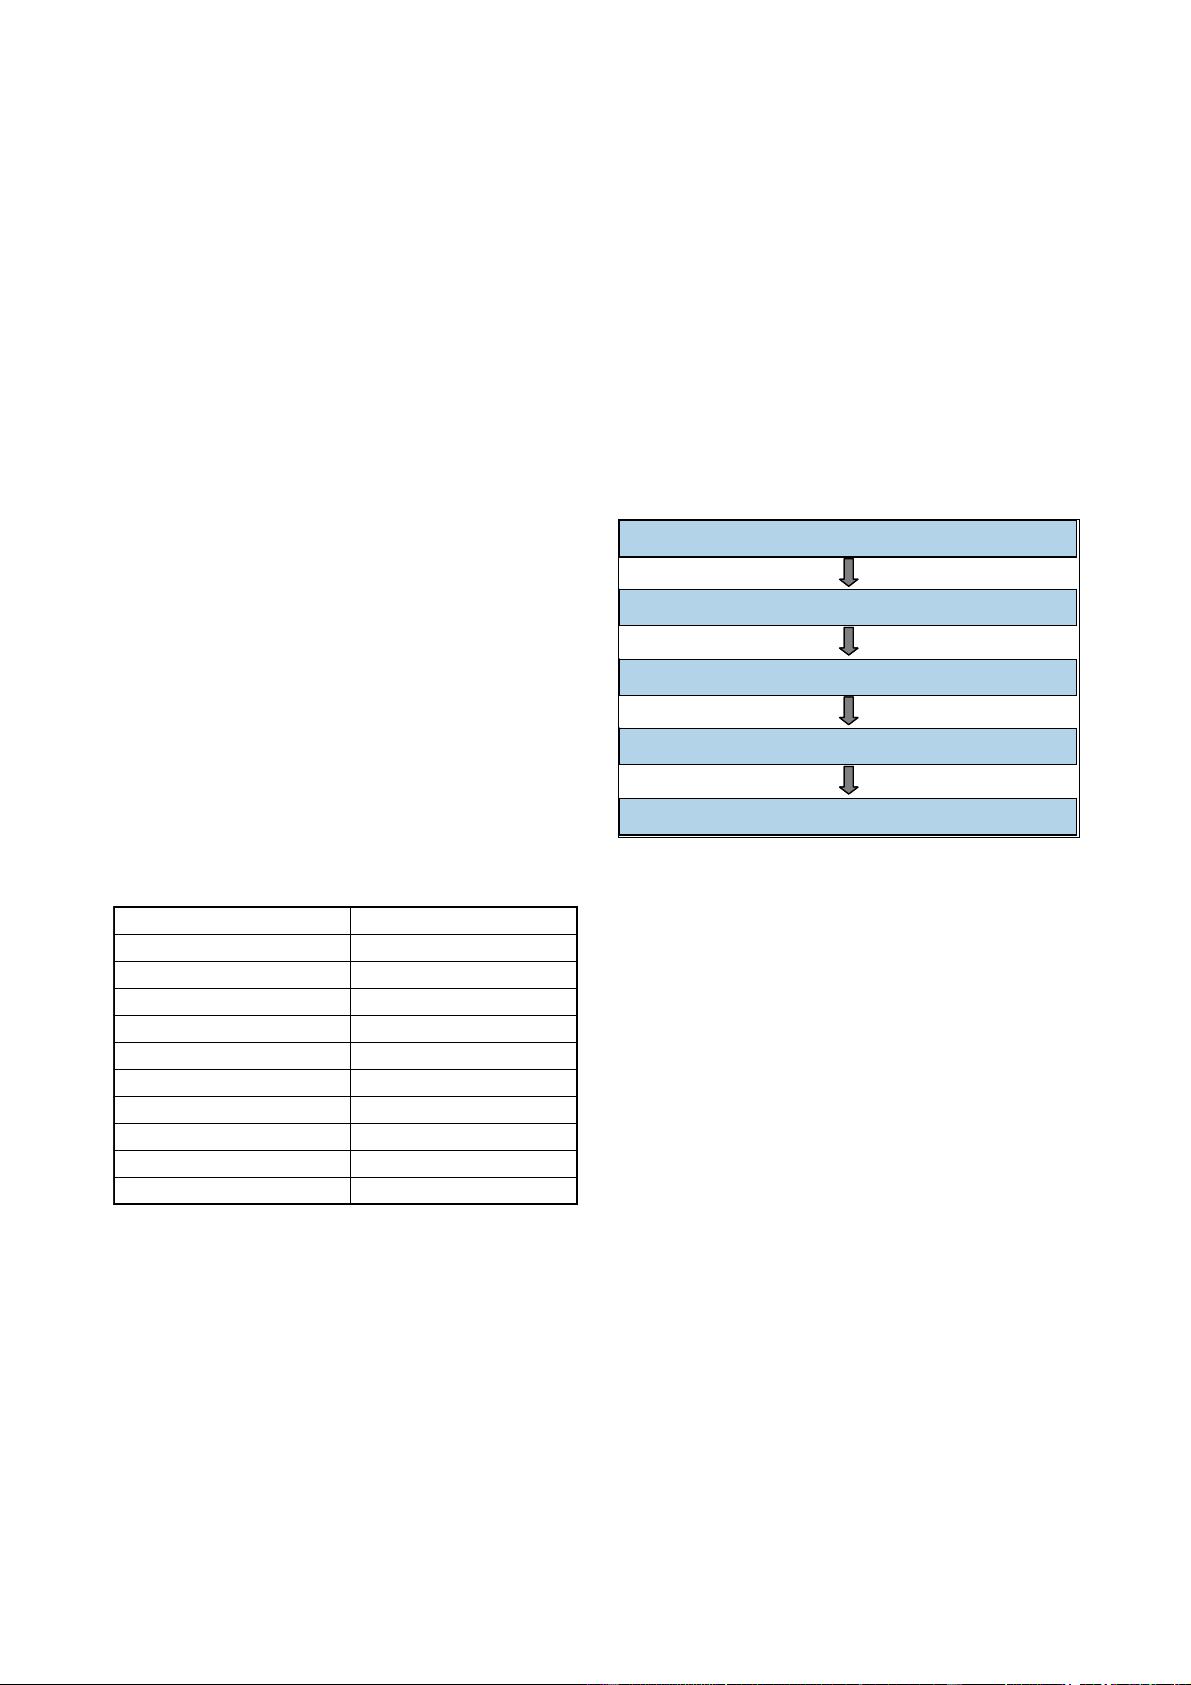
  • The simulation of the thermo-mechanical load was divided in four phases, as depicted in Figure 1.
  • When steady-state conditions were reached as concerns cutting forces, chip thickness, shear angle and chip-tool contact length, a coupled thermo-mechanical Eulerian analysis was started based on the outputs of the previous one ( geometry, velocities, forces and so on).
  • A general acceptable agreement between measured and calculated forces can be observed.

3.2.2 Numerical results

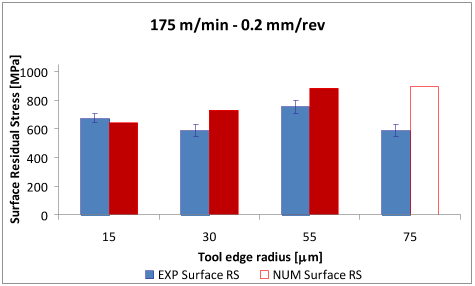
  • Figures 6 and 7 show the comparison of predicted surface residual stresses to measured data, at a cutting speed of 175 m/min and for a feed respectively equals to 0.05 mm/rev and to 0.2 mm/rev.
  • All the values are referred to the circumferential component of the residual stresses.
  • A general good predictive capability of the FEM model can be observed.
  • On the other hand, Figure 6 and Figure 7 illustrate that the predicted residual stresses always increase with the cutting edge radius.
  • This slight difference between measured and predicted trends can be due to the simplification introduced in the numerical model, by using a 2D orthogonal model.

4 CONCLUSIONS

  • A numerical analysis of residual stresses induced by orthogonal cutting of AISI 1045 was performed in the present investigation.
  • Particularly, it was demonstrated that the reliability of any FE numerical model for predicting the residual stresses is strictly related to the proper prediction of both mechanical and thermal aspects.
  • Permitting to obtain good numerical prediction in terms of superficial as well as in-depth residual stresses.
  • In fact, as illustrated in this research, a reasonable agreement was obtained between the numerical predicted residual stresses and those experimentally measured.

Did you find this useful? Give us your feedback

Content maybe subject to copyright    Report

09 August 2022
POLITECNICO DI TORINO
Repository ISTITUZIONALE
Finite element analysis of residual stresses in machining / Rizzuti, Stefania; Umbrello, D.; Filice, L.; Settineri, Luca. - In:
INTERNATIONAL JOURNAL OF MATERIAL FORMING. - ISSN 1960-6206. - STAMPA. - Vol. 3, Suppl. 1:(2010), pp.
431-434. [10.1007/s12289-010-0799-8]
Original
Finite element analysis of residual stresses in machining
Publisher:
Published
DOI:10.1007/s12289-010-0799-8
Terms of use:
openAccess
Publisher copyright
(Article begins on next page)
This article is made available under terms and conditions as specified in the corresponding bibliographic description in
the repository
Availability:
This version is available at: 11583/2374498 since:
Springer

____________________
* Corresponding author: Corso Duca degli Abruzzi 24, 10129 Torino, Italy phone: +39-011-0907228, fax: +39-011-0907299, email
address: stefania.rizzuti@polito.it
FINITE ELEMENT ANALYSIS OF RESIDUAL STRESSES IN MACHINING
S. Rizzuti
1*
, D. Umbrello
2
, L. Filice
2
, L. Settineri
1
1
Politecnico di Torino – Dept. of Production Systems and Business Economics – Italy
2
University of Calabria – Dept. of Mechanical Engineering – Italy
ABSTRACT: Residual stresses play an important role in the service quality of a component. Therefore, it is essential to
predict and control residual stresses on the machined surface and subsurface. The paper is focused on the numerical
prediction of residual stresses in the orthogonal cutting process of a mild steel. An advanced approach to model heat
transfer phenomena at the tool-chip interface was included in the numerical simulation. The FEM results were
compared with some experimental data obtained turning AISI 1045 steel using uncoated WC tool.
KEYWORDS: Cutting, Residual Stresses, Heat transfer coefficient, FEM.
1 INTRODUCTION
The machining process provokes a residual stress in the
surface layer.
The main causes of residual stresses in machining are:
(a) inhomogeneous plastic deformation caused by the
mechanical, thermal (frictional) and metallurgical
effects, and (b) microstructural transformation associated
with the temperature and chip formation process.
The residual stresses on the machining surface are an
important factor in determining the performance and
fatigue strength of components.
They plays an important role in the service quality of a
component. The functional behaviour of machined
components can be enhanced or impaired by residual
stresses. Therefore, it is essential to predict and control
residual stresses on the machined surface and subsurface.
Many research efforts have been made in this direction,
including experimental findings, analytical modelling,
finite element modelling, and various combinations of
those aspects.
Most research on cutting operations has emphasized that
cutting parameters [1-7], tool material and geometry [3,
5, 8, 9] and the nature of the worked material [3, 8, 10]
heavily influence the development of tensile or
compressive residual stresses.
Nevertheless, there are still opportunities for advancing
predictive residual stress methods.
The paper is focused on the numerical prediction of
residual stresses in the orthogonal cutting process of a
mild steel. An advanced approach to model heat transfer
phenomena at the tool-chip interface was included in the
numerical simulation. The FEM results were compared
with some experimental data obtained turning AISI 1045
steel using uncoated WC tool; a good agreement was
found out.
2 THERMAL ASPECTS IN MACHINING
Despite FEM codes are nowadays widely utilized, there
is still a relevant lack of knowledge which remarkably
limits their successful application to the design of cutting
processes. The most relevant criticisms involve material
characterization for strain, strain rate, material hardness
and temperature conditions typical of machining, friction
data at the tool/part interface, chip formation and heat
transfer conditions.
Obviously these aspects influence the effectiveness of
the results provided by finite element simulation, such as
residual stresses.
The problem is quite complex because the model must
be a coupled thermo-mechanical one. In fact, the residual
stresses are generated not only by the material
deformation but also by the thermal cycle at which the
material is subjected during the cutting process.
According to this, it is clear that prediction of
temperature is a key factor and all the aspects related to
heat flux have to be carefully taken into account.
Nevertheless, main difficulties are still encountered in
temperature modelling of cutting processes.
One of the main problem in temperature modelling, by
using the updated-Lagrangian formulation, is that only
few milliseconds of cutting time can be simulated, even
in the case of 2-D simulations of orthogonal cutting
conditions. This very low time is a limit of the
modelling, which introduces several problems related to
heat generation and diffusion into the tool. In fact, no
steady-state conditions are reached during the numerical
simulation.
Among the parameters to be set in the numerical
simulation, the global heat transfer coefficient at the
tool-chip interface (h) plays a relevant role because it
directly impacts on the temperature evolution.

In this paper, an advanced approach to carry out a
coupled thermo-mechanical analysis of orthogonal
cutting is proposed. First of all, numerical simulation is
based on a mixed updated Lagrangian – Eulerian
approach. Furthermore, heat transfer at the tool-chip
interface is taken into account by means of a global heat
transfer coefficient at the tool-chip interface, which is
function of the cutting parameters of the process. The
details of the entire procedure will be illustrated in the
next paragraph.
3 RESIDUAL STRESSES PREDICTION
3.1 EXPERIMENTAL TESTS
The proposed approach was applied to the prediction of
the residual stresses in orthogonal cutting.
The validity of the entire procedure was verified by
comparing numerical and experimental results taken
from literature [11].
In [11] some AISI 1045 steel disks were dry machined
orthogonally with uncoated carbide tools, using four
different cutting edge radii and three different feeds.
The experimental set-up included a dynamometer for
measurement of cutting forces. Table 1 shows the cutting
conditions used during the dry orthogonal cutting of
AISI 1045 steel. The experiments were repeated three
times. The two components of the cutting force, namely
the feed (Ft) and the cutting forces (Fc), were measured
using a KISTLER 9121 three-component tool
dynamometer.
Table 1: Cutting conditions
15, 30, 55, 75Tool edge radius [mm]
P20Tool grade
Uncoated carbideTool material
TNMG-432Tool insert type
3Disk thickness [mm]
152Disk diameter [mm]
200Hardness [HB]
AISI 1045 steelWork material
3Width of cut [mm]
0.05, 0.2Feed [mm/rev]
175Cutting speed [m/min]
15, 30, 55, 75Tool edge radius [mm]
P20Tool grade
Uncoated carbideTool material
TNMG-432Tool insert type
3Disk thickness [mm]
152Disk diameter [mm]
200Hardness [HB]
AISI 1045 steelWork material
3Width of cut [mm]
0.05, 0.2Feed [mm/rev]
175Cutting speed [m/min]
X-ray diffraction method was used to measure residual
stress, and this was accomplished by measuring the
changes in the distance between crystallographic planes
from the unstressed to the deformed condition, i.e., using
d-spacing, as a strain gage. Two components of the
residual stresses, the axial and the circumferential, were
measured on the AISI 1045 steel disk machined surface,
but only circumferential stress were taken into account in
the numerical procedure.
3.2 NUMERICAL APPROACH
3.2.1 Set-up and verification of the numerical model
As far as numerical simulations are concerned, the SFTC
Deform-2D code was utilized. The workpiece was
modelled as elastic-plastic, while the tool as rigid. The
material behaviour of the AISI 1045 steel was described
using the Oxley model [12]. As concerns friction, a
simple model based on the constant shear hypothesis
(τ=mτ
0
) was implemented, setting m=0.82. The
simulation of the thermo-mechanical load was divided in
four phases, as depicted in Figure 1.
At first a plane-strain updated-Lagrangian analysis was
carried out: no temperature effect was taken into account
and the global heat transfer coefficient, h, was fixed
equal to 0 kW/m
2
K.
Lagrangian incremental simulation (h=0 kW/m
2
K)
Steady-state machining h=h(V
c
,f)
Residual stresses calculation
Unloading phase
Lagrangian incremental simulation h=h(V
c
,f)
Lagrangian incremental simulation (h=0 kW/m
2
K)
Steady-state machining h=h(V
c
,f)
Residual stresses calculation
Unloading phase
Lagrangian incremental simulation h=h(V
c
,f)
Figure 1: Simulation procedure
When steady-state conditions were reached as concerns
cutting forces, chip thickness, shear angle and chip-tool
contact length, a coupled thermo-mechanical Eulerian
analysis was started based on the outputs of the previous
one ( geometry, velocities, forces and so on). At this
stage, the global heat transfer coefficient at the tool-chip
interface, h, was assumed as a function of both the
normal pressure and the temperature along the contact
length [13,14]. In the above mentioned papers, the
authors related the coefficient, h, also to the cutting
parameters (cutting speed, V
c
, and feed rate, f):
2
2
4060000276.0795036.2442 fVfVh
cc
++=
(1)
and demonstrated the effectiveness of temperature
predictions.
After that, before running the final unloading simulation
(which correspond with a cooling simulation too), it was
necessary to run an intermediate Lagrangian simulation
in order to allow the calculation of the final stress state
in the workpiece.
Figures from 2 to 5 show the comparison between
experimental and numerical cutting and thrust forces, for
a fixed cutting speed (V
c
=175 m/min) and for two
different feed rates, namely 0.05 and 0.2 mm/rev.

A general acceptable agreement between measured and
calculated forces can be observed. In addition the
experimental trend at the varying of the tool edge radius
is also respected in the numerical predictions.
0
100
200
300
400
500
600
700
15 30 55 75
Tooledgeradius[
μ
m]
CuttingForceFc[N]
experiment simulation
Figure 2: Experimental and numerical cutting forces for
V=175 m/min and f=0.05 mm/rev.
0
50
100
150
200
250
300
350
400
15 30 55 75
Tooledgeradius[
μ
m]
ThrustForceFt[N]
experiment simulation
Figure 3: Experimental and numerical thrust forces for
V=175 m/min and f=0.05 mm/rev.
0
200
400
600
800
1000
1200
15 30 55 75
Tooledgeradius[
μ
m]
CuttingForceFc[N]
experiment simulation
Figure 4: Experimental and numerical cutting forces for
V=175 m/min and f=0.2 mm/rev.
Finally, since an automatic method for collecting the
residual stresses is not yet implemented in SFTC-
DEFORM-2D
®
V.10, the following procedure was
employed: (i) For several time steps, the tool was released
from the machined surface (unloading phase) and the
workpiece was cooled down to the room temperature; (ii)
surface and in-depth residual stresses at several locations of
the machined surface were collected and the average values
were calculated.
0
100
200
300
400
500
600
15 30 55 75
Tooledgeradius[
μ
m]
ThrustForceFt[N]
experiment simulation
Figure 5: Experimental and numerical thrust forces for
V=175 m/min and f=0.2 mm/rev.
3.2.2 Numerical results
Figures 6 and 7 show the comparison of predicted
surface residual stresses to measured data, at a cutting
speed of 175 m/min and for a feed respectively equals to
0.05 mm/rev and to 0.2 mm/rev.
175m/min‐0.05mm/rev
0
200
400
600
800
1000
15 30 55 75
Tooledgeradius[
μ
m]
SurfaceResidualStress[MPa]
EXPSurfaceRS NUMSurfaceRS
Figure 6: Experimental and calculated surface residual
stresses (V=175 m/min; f=0.05 mm/rev).
All the values are referred to the circumferential
component of the residual stresses. A general good
predictive capability of the FEM model can be observed.
175m/min‐0.2mm/rev
0
200
400
600
800
1000
15 30 55 75
Tooledgeradius[μm]
SurfaceResidualStress[MPa]
EXPSurfaceRS NUMSurfaceRS
Figure 7: Experimental and calculated surface residual
stresses (V=175 m/min; f=0.2 mm/rev).

As shown in Figure 7, experimental residual stresses
increase with an increase in the edge radius up to a 30
micron edge radius, however there is a decrease in the
values of residual stresses for edge radii of 55 and 75
μm.
On the other hand, Figure 6 and Figure 7 illustrate that
the predicted residual stresses always increase with the
cutting edge radius. This slight difference between
measured and predicted trends can be due to the
simplification introduced in the numerical model, by
using a 2D orthogonal model.
Finally, Figure 8 shows both predicted and measured in-
depth circumferential residual stresses for a cutting
speed of 175 m/min, an uncut chip thickness of 0.05 mm
and a cutting edge radius equal to 55 μm. As depicted in
Figure 8, the predicted and measured in-depth residual
stress profiles are very well correlated.
175m/min‐0.05mm /rev
200
0
200
400
600
800
1000
0 50 100 150 200 250
Distancefromthemachinedsurface[
μ
m]
CircumferentialResidualStress[MPa]
Experimental
Numerical
Figure 8: Experimental and calculated circumferential
residual stress profile (V=175 m/min; f=0.05 mm/rev;
r=55
μ
m).
Moreover, tensile residual stresses were found on the
machined surface, while compressive residual stresses
can be observed below the surface.
4 CONCLUSIONS
A numerical analysis of residual stresses induced by
orthogonal cutting of AISI 1045 was performed in the
present investigation. Particularly, it was demonstrated
that the reliability of any FE numerical model for
predicting the residual stresses is strictly related to the
proper prediction of both mechanical and thermal
aspects. In this paper all these aspects were carefully
taken into account and modelled, permitting to obtain
good numerical prediction in terms of superficial as well
as in-depth residual stresses. In fact, as illustrated in this
research, a reasonable agreement was obtained between
the numerical predicted residual stresses and those
experimentally measured.
REFERENCES
[1] Mittal, S., Liu, C.R.: A Method of Modeling
Residual Stresses in Superfinishing Hard Turning.
Wear, 218:21-33, 1998.
[2] Capello, E.: Residual Stresses in Turning. Part I:
Influence of Process Parameters. Journal of
Materials Processing Technology, 160:221-228,
2005.
[3] Hua, J., Shivpuri, R., Cheng, X., Bedekar, V.,
Matsumoto, Y., Hashimoto, F., Watkins, T.R.:
Effect of Feed Rate, Workpiece Hardness and
Cutting Edge on Subsurface Residual Stress in the
Hard Turning of Bearing Steel Using Chamfer +
Hone Cutting Edge Geometry. Material Science and
Engineering A, 394:238-248, 2005.
[4] Matsumoto, Y., Hashimoto, F., Lahoti, G.: Surface
Integrity Generated by Precision Hard Turning.
Annals of CIRP, 48(1):59-62, 1999.
[5] Dahlman, P., Gunnberg, F., Jacobson, M.: The
Influence of Rake Angle, Cutting Feed and Cutting
Depth on Residual Stresses in Hard Turning. Journal
of Materials Processing Technology, 147:181-184,
2004.
[6] Jacobson, M., Dahlman, P., Gunnberg, F.: Cutting
Speed Influence on Surface Integrity of Hard
Turned Bainite Steel. Journal of Material Processing
Technology, 128:318-323, 2002.
[7] Rech, J., Moisan, A.: Surface Integrity in Finish
Hard Turning of Case-Hardened Steels.
International Journal of Machine Tools &
Manufacture, 43:543-550, 2003.
[8] Thiele, J.D., Melkote, S.N., Peascoe, R.A., Watkins,
T.R.: Effect of Cutting-Edge Geometry and
Workpiece Hardness on Surface Residual Stresses
in Finish Hard Turning of AISI 52100 Steel.
Transaction of the ASME, 122:642-649, 2000.
[9] Outeiro, J.C., Dias, A.M., Jawahir, I.S.: On the
Effects of Residual Stresses Induced by Coated and
Uncoated Cutting Tools with Finite Edge Radii in
Turning Operations. Annals of CIRP, 55(1):111-
116, 2006.
[10] Capello, E.: Residual Stresses in Turning. Part II:
Influence of the Machined Material. Journal of
Materials Processing Technology, 172:319-326,
2006.
[11] Kandibanda R.: Topology-based modelling and
analysis of orthogonal cutting process. Master’s
degree thesis, University of Kentucky, 2008.
[12] Oxley P.L.B., Mechanics of Machining, An
Analytical Approach to Assessing Machinability,
Halsted Press, New York, 1989.
[13] Filice L., Micari F., Rizzuti S., Umbrello D.: On the
evaluation of the global heat transfer coefficient in
cutting. International Journal of Machine Tools and
Manufacture, 47(11): 1738-1743, 2007.
[14] Ceretti E., Filice L., Umbrello D., Micari F.: ALE
simulation of orthogonal cutting: A new approach to
model heat transfer phenomena at the tool-chip
interface. Annals of the CIRP, 56(1):47-50, 2007.
Citations
More filters
Journal ArticleDOI
TL;DR: The present paper highlights the effect of feed rate, depth of cut, cutting velocity and percentage intensity of ultrasonic power on residual stress generation.

88 citations

Journal ArticleDOI
TL;DR: In this article, an attempt has been made to investigate the effect of cutting parameters on surface roughness, tool wear, and residual stress distribution in hard turning in manufacturing industry as an economic alternative to grinding, but the reliability of hard turning processes is often unpredictable.
Abstract: Hard turning is used in the manufacturing industry as an economic alternative to grinding, but the reliability of hard turning processes is often unpredictable. The main factors affecting the reliability of hard turning are surface integrity and tool wear. In the present study, an attempt has been made to investigate the effect of cutting parameters on surface roughness, tool wear, and residual stress distribution in hard turning. This article brings out the comprehensive analysis of the effects of cutting parameters on surface roughness, residual stress, and tool wear.

79 citations


Cites background from "Finite element analysis of residual..."

  • ...[ 80 ] concluded that the tensile residual stresses were found on the machined surface, while compressive residual stresses were observed below the surface....

    [...]

Journal ArticleDOI
TL;DR: In this paper, a physics-based approach focusing on the nature of contact stresses in various machining zones and the effect of machining temperature was proposed for the prediction of residual stresses in orthogonal machining of AISI4340 steel.

45 citations

Journal ArticleDOI
TL;DR: In this article, the authors compared two damage modeling approaches in metal cutting finite element simulations; the Johnson-Cook shear failure model and the progressive damage model, which assumes sudden failure when a set criterion is met; however, the second relies on two criteria; one for damage initiation and another for damage evolution.

30 citations

Journal ArticleDOI
TL;DR: In this paper, a continuum-mechanics based Finite Element (FE) modeling is established to obtain a better understanding of state of residual stress at surface and sub-surface level, and dynamic explicit time incrementation scheme with coupled temperature displacement transient analysis is performed.

26 citations

References
More filters
Journal ArticleDOI

315 citations


"Finite element analysis of residual..." refers methods in this paper

  • ...The material behaviour of the AISI 1045 steel was described using the Oxley model [12]....

    [...]

Journal ArticleDOI
TL;DR: In this paper, the effect of cutting parameters on residual stress was investigated in order to find why deep residual stresses are created, and it was determined that the tool edge geometry is the dominant factor deciding the residual stress profile.
Abstract: Rolling contact fatigue tests were conducted to find the effect of precision hard turning. The tests showed that hard turning provides as good a fatigue performance as grinding. Hard turning produces compressive residual stresses in a deep subsurface, which contribute to a long fatigue life. The effect of cutting parameters on residual stress was investigated in order to find why deep residual stresses are created. It was determined that the tool edge geometry is the dominant factor deciding the residual stress profile.

271 citations


"Finite element analysis of residual..." refers background in this paper

  • ...Most research on cutting operations has emphasized that cutting parameters [1-7], tool material and geometry [3, 5, 8, 9] and the nature of the worked material [3, 8, 10] heavily influence the development of tensile or compressive residual stresses....

    [...]

Journal ArticleDOI
TL;DR: In this paper, the influence of feed rate, cutting speed, and tool wear on the effects induced by hard turning on case-hardened 27MnCr5 gear conebrakes and point out the technical limitations in mass production.
Abstract: Highly stressed steel components, e.g., gears and bearing parts, are appropriate applications for hard turning. Therefore, the process effects on significant engineering properties of work materials have to be carefully analyzed. Roughness, residual stresses, and white layers as parts of surface integrity, are functions of the machining parameters and of the cuttability of the cutting edge, i.e. of the tool wear. The aim of this work was to study the influence of feed rate, cutting speed, and tool wear on the effects induced by hard turning on case-hardened 27MnCr5 gear conebrakes and to point out the technical limitations in mass production.

211 citations


"Finite element analysis of residual..." refers background in this paper

  • ...Most research on cutting operations has emphasized that cutting parameters [1-7], tool material and geometry [3, 5, 8, 9] and the nature of the worked material [3, 8, 10] heavily influence the development of tensile or compressive residual stresses....

    [...]

Journal ArticleDOI
TL;DR: In this paper, the effects of tool cutting-edge geometry (edge preparation) and workpiece hardness on surface residual stresses for finish hard turning of through-hardened AISI 52100 steel were investigated.
Abstract: An experimental investigation was conducted to determine the effects of tool cutting-edge geometry (edge preparation) and workpiece hardness on surface residual stresses for finish hard turning of through-hardened AISI 52100 steel. Polycrystalline cubic boron nitride (PCBN) inserts with representative types of edge geometry including up-sharp edges, edge hones, and chamfers were used as the cutting tools in this study. This study shows that tool edge geometry is highly influential with respect to surface residual stresses, which were measured using x-ray diffraction. In general, compressive surface residual stresses in the axial and circumferential directions were generated by large edge hone tools in longitudinal turning operations. Residual stresses in the axial and circumferential directions generated by large edge hone tools are typically more compressive than stresses produced by small edge hone tools. Microstructural analysis shows that thermally-induced phase transformation effects are present at all feeds and workpiece hardness values with the large edge hone tools, and only at high feeds and hardness values with the small edge hone tools. In general, continuous white layers on the workpiece surface correlate with compressive residual stresses, while over-tempered regions correlate with tensile or compressive residual stresses depending on the workpiece hardness.

193 citations


"Finite element analysis of residual..." refers background in this paper

  • ...Most research on cutting operations has emphasized that cutting parameters [1-7], tool material and geometry [3, 5, 8, 9] and the nature of the worked material [3, 8, 10] heavily influence the development of tensile or compressive residual stresses....

    [...]

Frequently Asked Questions (15)
Q1. What have the authors contributed in "Finite element analysis of residual stresses in machining" ?

The paper is focused on the numerical prediction of residual stresses in the orthogonal cutting process of a mild steel. 

When steady-state conditions were reached as concerns cutting forces, chip thickness, shear angle and chip-tool contact length, a coupled thermo-mechanical Eulerian analysis was started based on the outputs of the previous one ( geometry, velocities, forces and so on). 

The most relevant criticisms involve material characterization for strain, strain rate, material hardness and temperature conditions typical of machining, friction data at the tool/part interface, chip formation and heat transfer conditions. 

One of the main problem in temperature modelling, by using the updated-Lagrangian formulation, is that only few milliseconds of cutting time can be simulated, even in the case of 2-D simulations of orthogonal cutting conditions. 

The main causes of residual stresses in machining are: (a) inhomogeneous plastic deformation caused by the mechanical, thermal (frictional) and metallurgical effects, and (b) microstructural transformation associated with the temperature and chip formation process. 

heat transfer at the tool-chip interface is taken into account by means of a global heat transfer coefficient at the tool-chip interface, which is function of the cutting parameters of the process. 

X-ray diffraction method was used to measure residual stress, and this was accomplished by measuring the changes in the distance between crystallographic planes from the unstressed to the deformed condition, i.e., using d-spacing, as a strain gage. 

Most research on cutting operations has emphasized that cutting parameters [1-7], tool material and geometry [3, 5, 8, 9] and the nature of the worked material [3, 8, 10] heavily influence the development of tensile or compressive residual stresses. 

it was demonstrated that the reliability of any FE numerical model for predicting the residual stresses is strictly related to the proper prediction of both mechanical and thermal aspects. 

Among the parameters to be set in the numerical simulation, the global heat transfer coefficient at the tool-chip interface (h) plays a relevant role because it directly impacts on the temperature evolution. 

The residual stresses on the machining surface are an important factor in determining the performance and fatigue strength of components. 

At this stage, the global heat transfer coefficient at the tool-chip interface, h, was assumed as a function of both the normal pressure and the temperature along the contact length [13,14]. 

Many research efforts have been made in this direction, including experimental findings, analytical modelling, finite element modelling, and various combinations of those aspects. 

since an automatic method for collecting the residual stresses is not yet implemented in SFTCDEFORM-2D® V.10, the following procedure was employed: (i) For several time steps, the tool was released from the machined surface (unloading phase) and the workpiece was cooled down to the room temperature; (ii) surface and in-depth residual stresses at several locations ofthe machined surface were collected and the average values were calculated. 

At first a plane-strain updated-Lagrangian analysis was carried out: no temperature effect was taken into account and the global heat transfer coefficient, h, was fixed equal to 0 kW/m2K.