Background
In Chapter 1 of OJS Guide, we discussed the fundamentals of Open Journal Systems, including how SciSpace's OJS Hosting Suite helps you set up your journal cost-effectively.
Chapter 2 of A-Z of the OJS Guide will cover four main topics. Readers will understand what OJS can be used for along with accessibility and usability of its various features.
What we will cover in Chapter 2
By the end of the Chapter 2 of the OJS Guide, you will be able to Edit and Manage User Roles without any difficulty. Additionally, there are easy troubleshooting steps to resolve minor glitches that may crop up during usage. The first section delves into the details on how user roles & permissions can be configured with other site access options.
A clear explanation on how the Statistics feature can be leveraged while using Open Journal Systems 3 has also been provided. There are clear how-to guides. It also includes information on how to generate reports and methodology to analyze it. Besides, definitions of the statistics are included to ensure any misunderstanding is avoided.
The Tools section covers how users can use various tools provided by OJS 3.x with additional information on valuable plugins.
The Manage Subscriptions section outlines a fair amount of detail on how subscriptions can be managed and how each function can be used. The section also explains subscription policies and payment types.
Configure Users & Roles
This section provides information on access to all user accounts linked to your journal, as well as granting roles and permission. Dashboard access and functions are provided as per restrictions or role permissions granted. This means that a user with specific permissions will only have access to specified areas.
Managing Users
On the left sidebar go to Users and Roles>Users
Roles, user accounts, and granted levels of access can be viewed under the ‘Users & Roles’ tab.
The Journal Manager acts as the authority towards, both, the website management and all user access as well.

To export a list of users in an XML document, go to the tools menu and click on the export user option. You can gain access to your user data details after downloading it in CSV format by going through Statistics>Users
Users & Roles
Under the ‘Users’ tab, first name, last name, user name, and email address are displayed. All users are displayed in alphabetical order of the last name.
Some of the critical roles in OJS 3.3 are Site Administrator, Journal Manager, Editor, Section Editor, Author, Reviewer, Copyeditor, Layout Editor, Proofreader, Reader Translator, and Designer. It also offers you the option to customize user labels as per requirement.
To make changes to any user, click the left arrow provided beside the name.
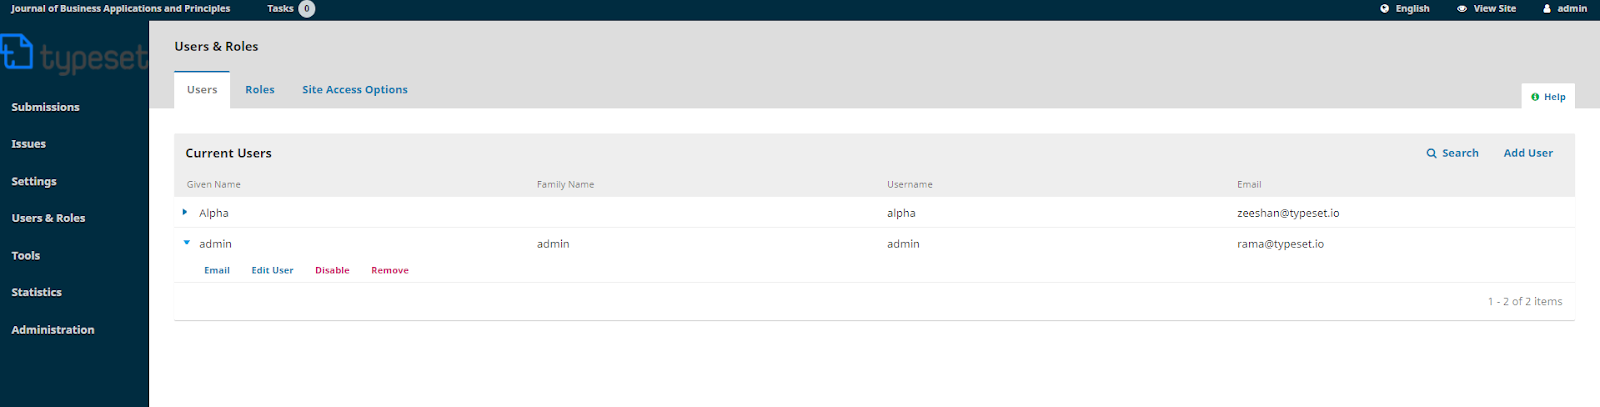
You will get options like Email, Edit User, Disable, Remove, Login As, Merge User to configure the user section as per your requirements.
Email Users
You can send user specific emails through this option. Just follow:
- In the Journal Manager or Editor’s dashboard, go to Users & Roles > Users
- Click on the user you want to email
- Click the blue arrow next to the user’s name to view the options below it.
- Click Email. A pop-up box will appear where you can type in your message and send it

Additionally, for submission related emails, it is advisable to send those emails through the submission section using the Discussion feature. This will help you in keeping all submission related emails sorted and organized in a single screen.
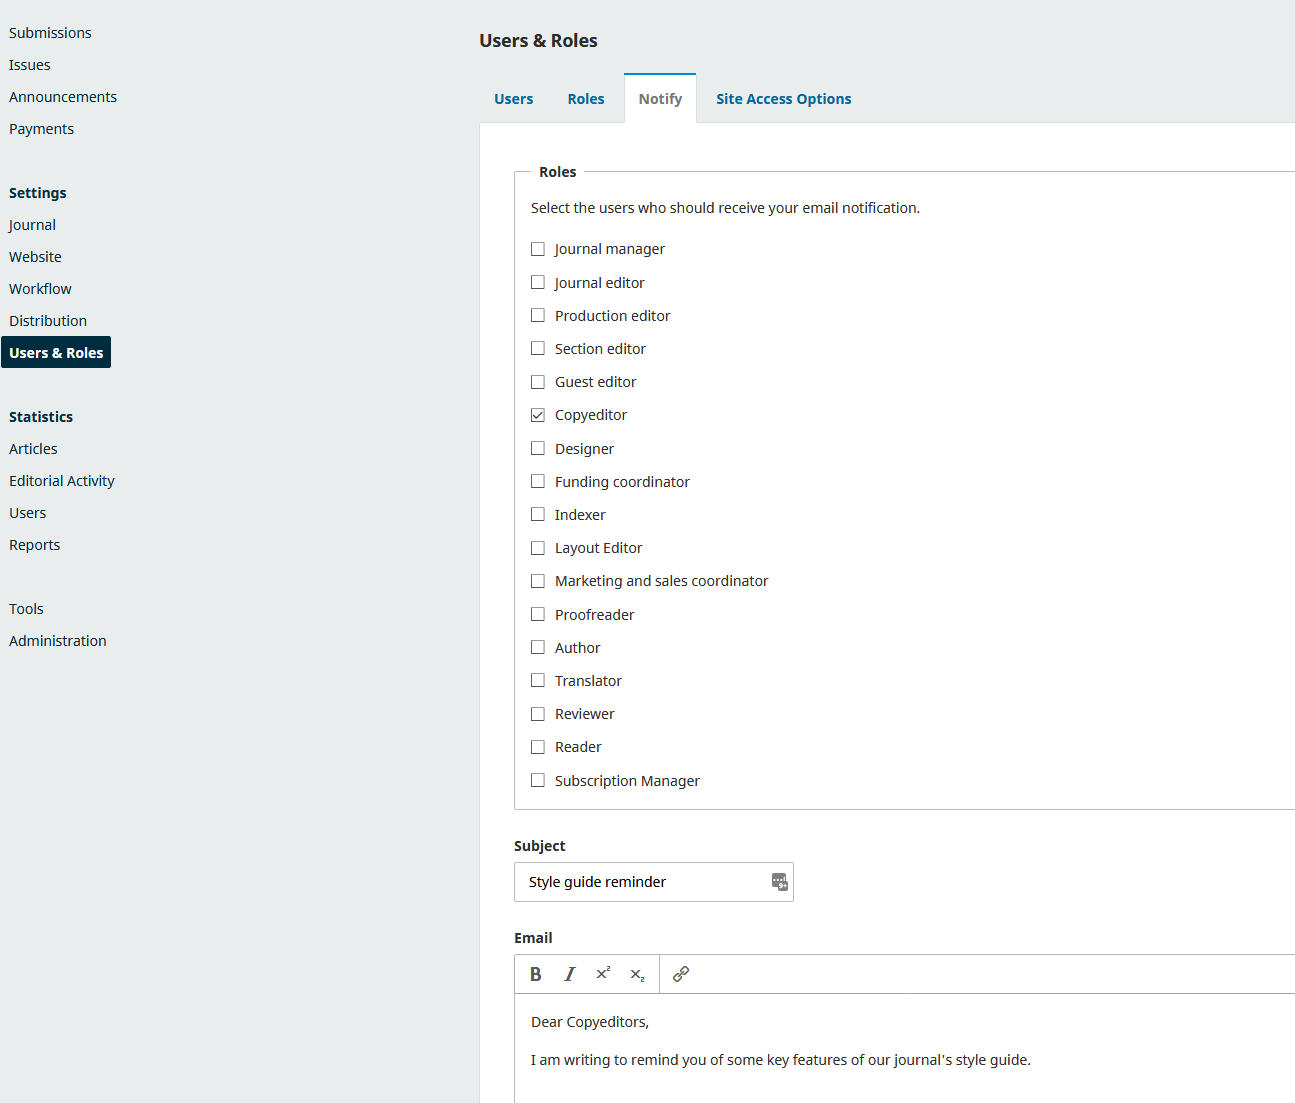
The OJS 3.x version provides you with an option to send bulk emails. To leverage this feature, you must enable it for each journal using Site Settings > Bulk Emails. Besides, the site administrator is provided with an option where he/she can disable certain users from receiving bulk emails.
Once enabled, the administrator can notify multiple users at the same time. Moreover, using the filter option emails can be sent to only users with certain roles. In the Notify Tab, you can choose the user roles to whom you want to communicate with. After that, you can proceed with a generic process like writing your subject and body of the email. Additionally, you get an option to send a mail copy to yourself too. Once completed, you will receive a notification on the status of emails being sent.
Edit User
Depending on the access level given, users can edit and manage permission levels under the Roles tab by clicking on Edit User.

The Edit option further allows you to select or deselect access for specific users for each stage. To access this, click on the blue arrow next to the user.
Options are available to Disable User, which leaves the account active but does not allow the user access to their functions.
Clicking on Remove takes away access to all roles in the journal while leaving the user account on the system.
Login As gives temporary access to login as another user.
Merge User
It allows you to combine accounts with other accounts, including assignments and pending submissions.
Pro Tip:This is the only way to remove a user account altogether. It is advisable to create a dummy account that can be used to merge accounts intended for deletion.
Merge users Procedure:
Go to Users & Roles > Users, and select desired user account for deletion
- Click on the blue arrow next to the username
- Click on Merge User from the menu below
- Select account to merge user account into (the dummy account or the account you want to maintain)
- Click on the blue arrow next to the username
- Click on Merge into this user
Search for Users
When there are numerous users, this feature makes it easy to find and edit user accounts.

Search using a first name or last name. You can also see all users under specific roles by leaving the search field blank, selecting the role, and clicking on search.

Add Users
Click on the Add User link to access a new user; a new window will open with fields to be filled in.
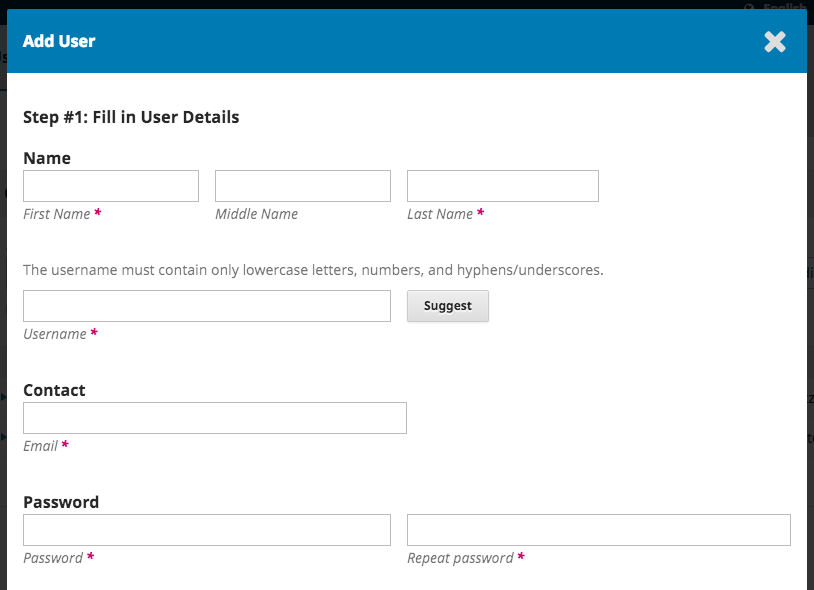
Upon completion of the fields, click on save.
Click on Add Role to access this option, choose Role, and click on save.
Register User from another Journal
In the instance of multiple journal installations, an administrator can register a user from a different journal. The steps are detailed below:
Log in to destination journal as an Administrator
- Go to Users & Roles > Users
- Select user from origin journal, click to checkbox next to Include users with no roles in this journal
- Click on the blue arrow next to the name
- Click on Edit User
- Scroll down to User Roles in the Edit User box
- Select the role that you want the user to have in the destination journal
- Click Save to complete
Troubleshoot: Unable to Login
If a user cannot log in to the journal, reset the password by choosing the ‘forgot you password’ option on the login page. Use the reset password link sent to the registered email address.
If users are still unable to log in, another user with Editor access or the Journal Manager can follow the steps below:
1) Go to Users & Roles > Users
2) Select the user who can’t log in and click on the blue arrow next to the name
3) Click Edit User below
4) Enter a new password in the password field; it is suggested that the new password is noted down
5) Check the box next to User must change the password on next login
6) Click on Save
7) Ask the user to attempt to log in with the new password
If the issue persists, the account may have been disabled. To re-activate, follow the steps below:
1) Go to Users & Roles > Users
2) Click on the blue arrow next to the user
3) There will be one of two options below their name, Enable or Disable. If the option Disable is available, the account is active. If Enable appears, click on Enable to activate the account.
Permissions and Roles
The OJS 3.x works on the collaborative effort of all its users. Users in the system must bear at least one role to access various options of the platform. Moreover, a single user can attain multiple roles, too. For example if you are the Journal Manager, you can adopt the working roles of Editor and Author as well in the same journal.
Permissions in OJS means the level of access a user has in the OJS platform. Details about the predefined roles that you can easily configure are provided below.
(Note: “*” refers to new roles available in OJS 3.X versions only.)
Site Administrator or Admin
A single Site Administrator role will be assigned during the installation of OJS 3.3. The Site Administrator will have access to the entire OJS installation and Site Settings. They may also add language files, create new journals and check server settings.
The Site Administrator permission level does not appear in User Lists or Role Settings.
Journal Manager
Journal managers can set up the journal website, configure system options, and manage user accounts. They also have access to the complete editorial workflow and other functions of the journal.
They can also create new sections in the journal, configure Review Forms, edit the default Emails, view statistics and reports, import and export data, and access the editorial workflow and all journal submissions.
Section Editors
While Section Editors have access to the whole journal, they do not have access to change the journal settings. The predefined roles assigned to section editors are Section Editor and Guest Editor*
Assistants
Users designated as Assistants get partial access to Editorial Workflow. Partial because of the permissions assigned as per their work. As per the workflow stages, various predefined Assistant Workflow roles are:
- Submission & Review stages: Funding Coordinator*
- Copyediting stage: Copyeditor, Marketing and Sales coordinator*
- Production Stage: Designer, Indexer*, Layout Editor, Proofreader
Assistants receive access to specific sections of the journal that have been assigned.
Journal assistants can communicate with other users as well as upload and revise files.
Reviewers
Reviewers also have access only to specific sections that have been assigned.
Authors
Author access allows the user to be able to make new entries in the journal
Readers
Base level access is given to Readers to be able to access the reader-facing website. All other users are given this access by default.
Subscription Manager
This is a new feature in OJS 3.3 that allows users to determine site access and subscription settings.
You can check and explore predefined and custom user roles & permissions that OJS 3.X provides from the Roles Tab:
This screen allows you to view the user role of every individual. Additionally, it allows you to see what level of workflow a user has gained visibility. For example a user assigned or designated as a copyeditor can’t gain access to the peer review workflow stage. Therefore, in this way you can keep the user tasks and roles limited yet organized.
Additionally, Site Administrators and Journal Managers are vested with powers by OJS 3.X to create new roles or modify the predefined ones.
Modifying or Editing Roles

Unticking the box against any user will disable the access options for that user from that particular work stage.
In addition, clicking on the blue arrow beside the name of the user role will open a pop up menu where you can easily edit the user roles.

Permission Level: It will be in the form of a drop down list. From the list you can choose one of the options as per the user role. This option decides what degree of access a user enjoys over the OJS platform.
Role Name: In case you wish to rename or modify the role name, you can do it easily using this option.
Abbreviation: To keep things simple and easy, you must specify distinct abbreviations or short names.
Stage Assignment: This option determines which part of the journal workflow a user can access.
Role Options: Tick down the options provided as it suits your journal requirements.
Of the 3 options provided, the first one should be enabled to ensure you have the user role on display while accessing the contributor list like the author list.
The second option can be enabled to ensure users can self register for certain roles. You must empower your journal manager and site administrator for self registration.
Depending upon the journal workflow or the command authority hierarchy, you can enable the third and the last option
Create New Roles
Now you can also create custom roles depending upon your requirements for the journal. The new role access and permission levels can also be set here.
Note: Users can be prevented from submitting new articles to the journal. To enable the feature go to Settings>Workflow>Submissions>Disable>Submissions, then place a check in the box at the bottom that says Disable Submissions.
Site Access Options
This is where you determine how readers access your journal. The administrator can select different options to limit access under the Additional Site and Article Access Restrictions. Either one or both of these options can be chosen.

The options are:
- Users must be registered and log in to view the journal site
- Users must be registered and log in to view open access content
The User Registration option allows administrators to decide if users can create their accounts or be created by a Journal Manager. It may be prudent to allow users to register themselves as authors, reviewers, or readers.
The options listed are:
- Visitors can register a user account with the journal
- The journal manager will register all user accounts. Editors or Section Editors may register user accounts for section reviewers.
Granting more access than that may prove problematic. It is also important to remember that while requesting registration to access content is a good way of tracking readership, there is a chance fewer readers will register.
Explore the Statistics section of OJS
This section covers how to use the Statistics feature of the OJS and how to use the various tools. It has clear information regarding the activity, access, and downloads of numerous parts of your website, namely abstract and article views, subscriptions, review, and editorial activity, as well as user count separated by role.
This is an excellent way to track performance and access.
The Report Generator allows users to generate useful reports using the existing data.
Definitions
The definitions here will help in understanding what statistics are tracked by the OJS.
Abstract Page
The Abstract serves as the landing page for the the journal article. The page contains a lot of useful information over the title, author information, abstract, DOI, and links to any article full-text galleys. This page serves as a record book against article DOIs and other hyperlinks. In any event of cross referencing the DOIs, it will lead to the abstract page rather than the galley file.
Article view
Article view is an important KPI and it means a single distinct view by a unique visitor. Additionally, article view count does not include cumulative views of all article and galley files.
Galley view
Galley View refers to single and distinct view or download of a galley file by a unique visitor. Therefore, it is also called as “Galley download”
Kindly note that the OJS does not make a distinction between a download and a view for a galley file; downloads and views for a galley file are treated as equal.
Moreover, the galley view exists differently for different galleys. For example if your article have multiple galley files like HTML, Epub or PDf then all formats will have separate galley views.
Multi-clicks
Usually prevalent in many sections of the journal publishing world, in order to increase the usage counts, users resort to clicking the buttons or links over the abstract page several times in a short span of time. This process of making multiple clicks is called Multi-Clicks.
OJs 3.x has been developed in such a way that it discovers and removes any attempt (accidental or deliberate) of multi-clicks to keep the usage metrics data clean,as per the provisions of Project COUNTER Code of Practice.
Project COUNTER Code of Practice
It is a set of directions created to ensure that the reports generated against the usage metrics are effective and true. The Code has laid down a set of rules on how to count views with special focus on multi-click abuse and robot usage. OJS filters metric data and then presents the final report.
Robots, crawlers, bots
Robots, bots or crawlers are the visitors to your site that come only for the metadata and machine readable information. These visits are important for ranking and indexing the journal website. As per the provisions of Project COUNTER Code of Practice, OJS does not include bots visit in its usage metrics.
Articles
OJS 3.x provides you with the options where that extracted Data can be analyzed and represented in graphs and tables. Later, the Journal Managers and Editors can access this data easily. The views can be abstract or full-text.
You can access it by going over to the left sidebar>Statistics>Articles.

OJS 3.x provides the flexibility of viewing the metrics in either tabular or graph formats. The user can change statistics displayed to either daily or monthly views. Additionally, you can filter and sort the results in ascending or descending order as per your requirements.


By clicking on the Calendar symbol, visible at the right of the dashboard, the view of the articles can be changed to the last thirty days, ninety days, or twelve months. You can customize the fetch results to return all dates or enter a specific range.

Clicking on the ‘filter’ icon at the top right of the interface allows the user to filter articles by section.

Statistics about specific articles by title, author, or manuscript ID can be fetched using the search option under the Article Details tab.

Editorial Activity
This is where the statistics related to editorial workflow are found. It includes:
- submissions
- number days to first editorial decision
- acceptance rates
- rejection rates
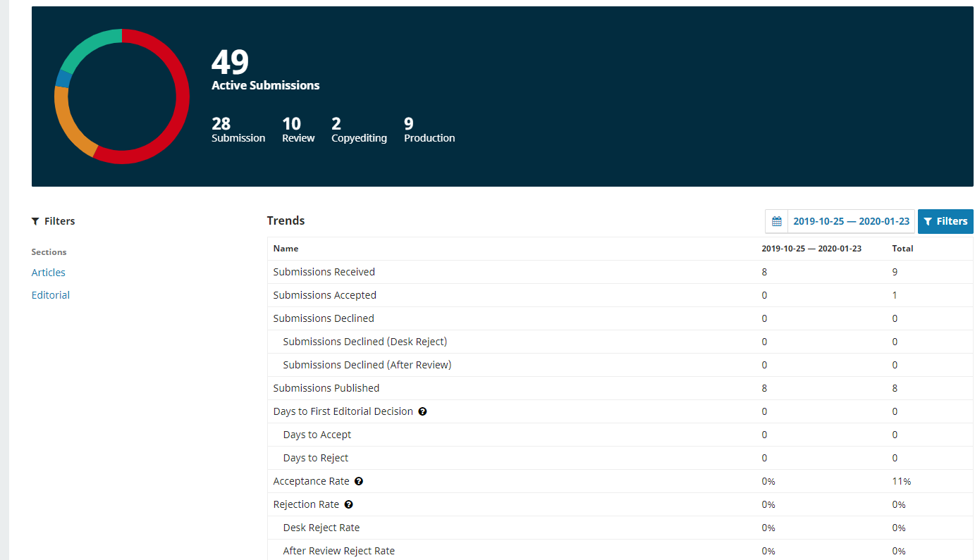
These results can also be filtered to return custom range requests.
Here are a few essential pieces of information when analyzing the data present in these reports.
The ‘published submissions’ option within a date range only counts initial publication dates, not later versions.
Days to decision has an 80% threshold restriction, so the data shown here represents 80% of the submissions within the date range that a decision has been taken on.
The acceptance and decline (rejection) rate only counts submissions that have received an accept/decline decision. They exclude submissions still in the queue.
A date range applied counts submissions that were submitted and accepted/declined within that date range. It is best to use extended, and older date ranges to get accurate acceptance/rejection rates.
Editorial Activity Reports are generated every month. These could be sent to Section Editors and Editors. By default, managers and editors are not included in the monthly report mailing list. This can be changed by accessing User Profile, Notifications, and then selecting or selecting the checkbox for the automated mail.
Users
The User section displays information about new users or role registrations within a specified period. The Total column shows how many users have a role in the system at the given time.
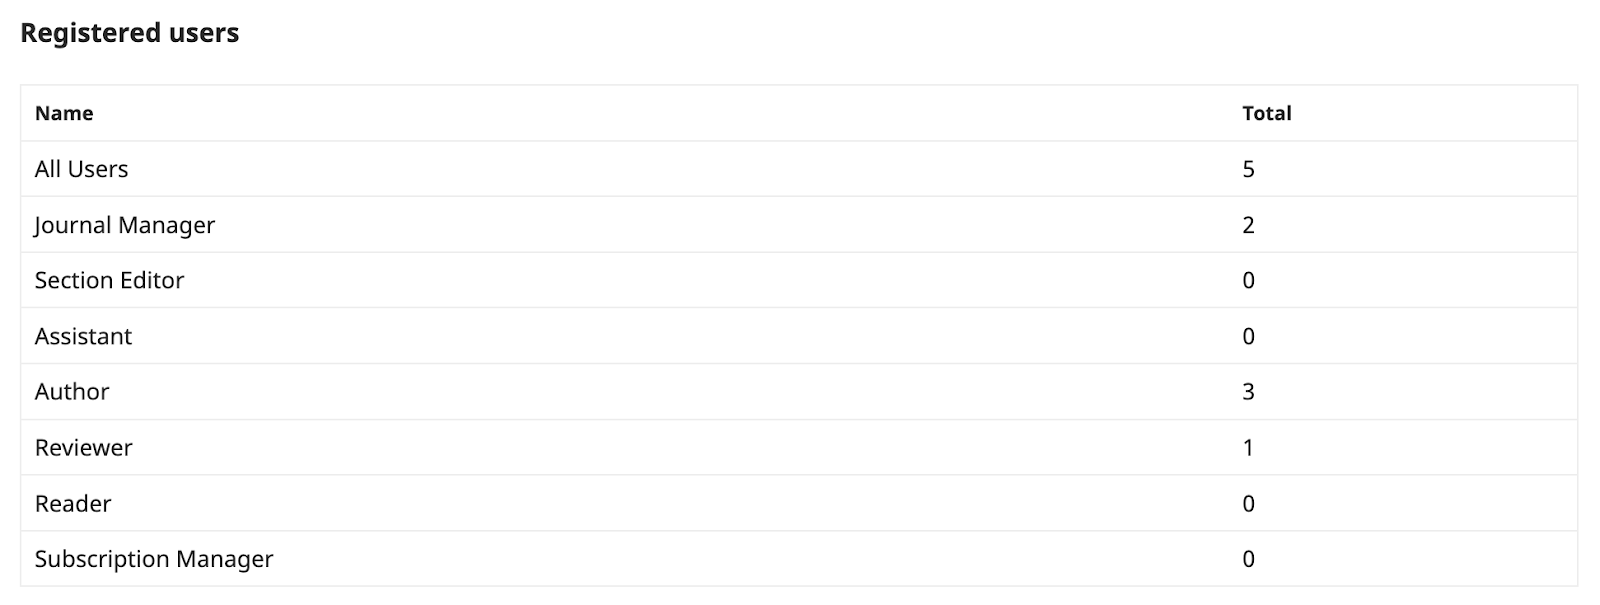
If an existing user’s role is changed, the number of users in that role will increase. However, the total number of overall users will not.
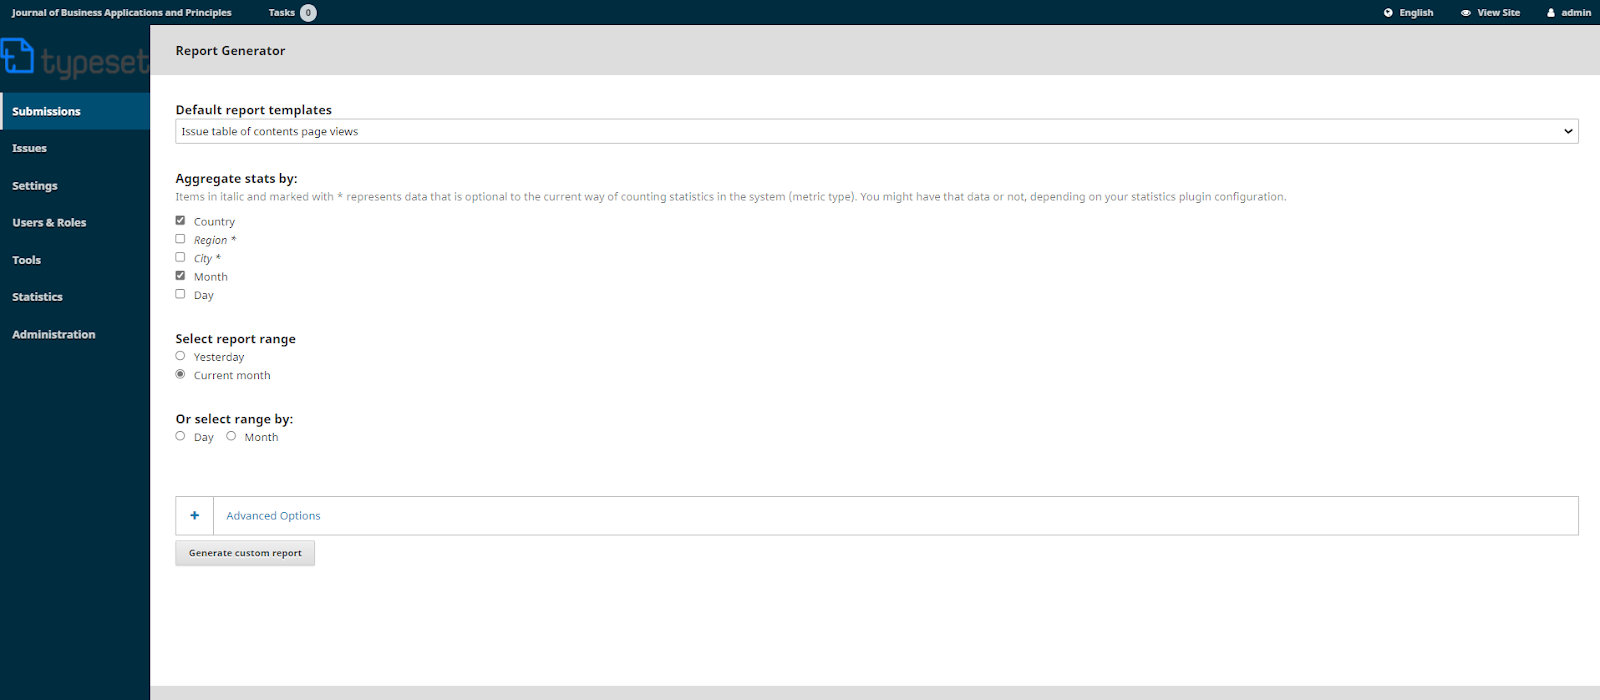
Report Generator
The Report Generator provides the detailed report based on various key metrics.

Details of site Usage and submissions within a period are tracked. These are categorized into “Usage” reports that contain statistics of visitor readership and content reports that provide reports over the respective metrics like review information. Since reports are generated in CSV format, an application such as MS Excel or Google sheets is required to view the data.
Usage Statistics Report: Shows daily usage data related to articles, article files, issues, and homepage views or downloads. Visitor’s country data will also be shown if it is being captured.
Subscriptions Report: Reflects information on individual and institutional subscriptions. If subscriptions have been enabled in the journal, the option will be available; else, it will not. (Content data)
Articles Report: This is a spreadsheet of all published articles. (Content data)
Counter Reports: COUNTER reports for all journals within the OJS application are shown here with monthly and year-to-date aggregate counts for abstract and galley views. (Usage data)
Review Report: Reflects review details about all articles in the system, including reviewer details, reviews, and recommendations are given. (Content data)
View Report: Provides a report on galley and abstract views by readers. Meaning how many times an article PDF has been viewed. (Usage data)
Custom Report Generation: This is a customizable Usage Statistics report, where various values can be selected and dates can be chosen. (Usage data)
Usage Statistics Report
The Usage Statistics Report provides precise data only month on month views of the homepage. It also outlines the Issue table of contents, article abstract landing page views, and file views in CSV format, which needs a spreadsheet application to view.
Additionally, if the system has been configured to fetch country information, it will also provide it. In each row, a total monthly count for each item is found.
Suggested usage
To generate and compare detailed report overviews of monthly content usage. You can easily gather details on view counts for all articles, article file downloads, issue TOC views, and journal homepage views for the specified timespan.To create aggregate data, additional fields must be added manually.
**Should not be used to replace the custom report generator. While the generator attempts to collate various aspects of the journal, there may be a delay in fetching data from vast datasets or legacy usage.
The Customer Report Generator can fetch specific results.
Notes: The Usage Statistics Report captures the overall usage history of the journal homepage. This includes article abstracts, article galleys, and issue TOCs.
In previous versions, i.e., installs before version 3.1.1, the report is restricted to 5000 results to avoid downloads timing out. If there is a vast amount of data, this report will not provide the required clarity or details, in some cases, may altogether omit information.
It is advisable to use the Custom Report Generator and specify smaller data ranges and specific datasets.
View Report
This View Report option displays abstract views and galley views or downloads for each article. The usage statistics will not be filtered to omit multi-clicks or bot and crawler activity, which is why these numbers may be higher when compared to recent statistics.
For example in the below image you can see that the PDf and the total galley view counts are equal. It is because there exists zero views against the HTML option. Whereas for the article Id 1125, the abstract views and the total galley view stands at 1821 and 8478 respectively. The total galley view here is the cumulative value of PDF and HTML.

Generate Custom Report
This function allows users to build customized reports by selecting desired variables. It will enable the user to generate reports from all the available data. Aggregate results can be filtered by:
- Country
- Region
- City
- Month
- Day
- Tools
Metrics are tracked against specific item types, which are also known as objects:
- File downloads
- Abstract views
- Issue Table of Contents views
- Journal Homepage views
OJS also allows custom reports to be generated within a specified period. Being the most versatile report function in OJS, this report function provides the most accurate results.
Notes:
1) If a report times out before delivering the requested data, it may be due to a vast amount of data. It is advisable to reduce the period that is being fetched.
2) For every customer report that is generated, a report URL will also be generated. Once the page is refreshed, the link will not be available; ensure that it is saved. It can be helpful to extract a report that fetches the same parameters in the future.
3) When entering a date span, if the selected date span is 1st March 2020 to 1st March 2021, the URL mentioned above will fetch results for that period. If ‘Yesterday’ or ‘Current Month’ is selected, the URL will return results based on the current date.
i.e. a URL with parameters set to fetch yesterday’s data on the 1st of March 2020, if used again on 3rd August 2021, will return information on 2nd August 2021.
4) Current day data is not available until the next day.
5) The generator is ideally a data conduit. To get the most accurate results, narrow down the elements and select the specific parameters that require investigation.
6) Using Advanced Options is the best way to get the most accurate results. All the examples below make use of the advanced options.
Examples of usage:
1) To find out how a particular issue has performed over the last six months.
This request will return information on how many full-text galleys have been downloaded of that specific issue over the selected period.

There will be three sections, one for the month, the total count for that month, and a separate row for each month.
Under “Default report templates,” select “Article file downloads” from the dropdown list.
Uncheck all boxes in the “Aggregate stats by”
Select month range by clicking on the “Month” radio button and enter date range under “Or select range by”
Go to Advanced Options and select Month from the dropdown list under Columns.

Then select the galley formats that are to be included in the report. Either PDF or HTML/DOCS/OTHER can be chosen, depending on what downloads your journal offers.
To select multiple types, use CTRL+Left Click or Command+Left Click.
The next step is to enter the object ID of the desired issue.
Do not select “By geolocation” and “Order by” options, and click on “Generate custom report.”

A simple monthly report (sample pic below) of the galley downloads for the selected period will be returned in CSV format.

Make sure that the URL displayed at the bottom of the page is saved to keep for records.
2) To generate a report on the most downloaded articles over the last three years.
A list of article titles and their origins will be generated in this report. They will be listed in descending order of downloads.
Select “Article file downloads” from the dropdown box
Uncheck all the boxes under “Aggregate stats by”
Select the “Month” radio button and enter a date range

Select only “Article” and “Issue” under Columns, which can be narrowed down later.

Select “Submission Files” under object type and galley types that are to be included

Do not select “geolocation”
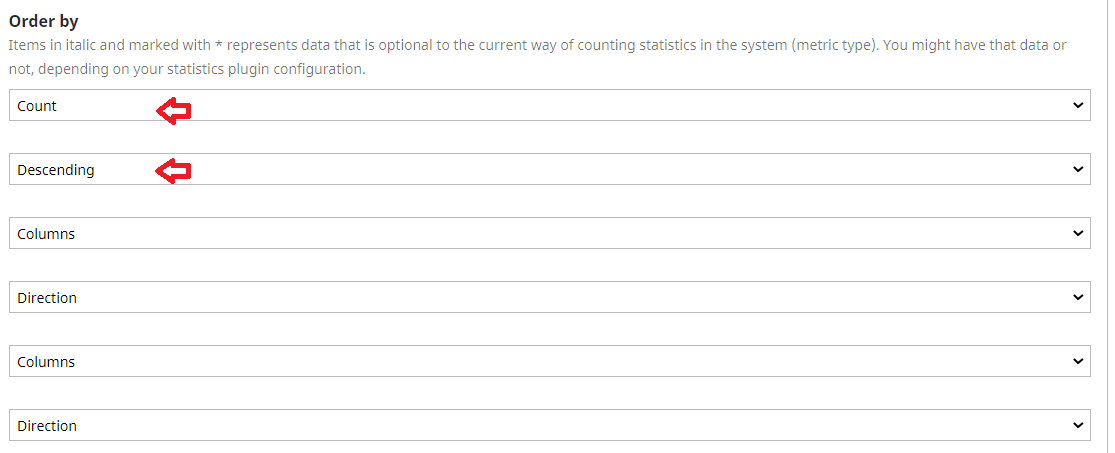
“Order by” is to select the desired order
A Customer report (sample Image below) will be generated in CSV format.

Save the URL at the bottom of the page for future reference
3) To find out which countries are downloading the journal content the most.
When a date range is specified, this query will return aggregate counts for full-text downloads by country in descending order.
Select “Article file downloads” from the dropdown box
Uncheck all of the boxes under “Aggregate stats by”
Select “Month” and enter a date range

Select “Journal” and “Country” under columns

Under “Filters” and under object type select “Submission Files,” then select the file types desired

“Order by” selects the order by number of downloads of articles

Once the report is run, your data will be available

Remember to keep the URL for use later on
Display Usage Statistics for Readers
The Usage Statistics Plugin can display usage statistics of an article for the current year in graph format. You can refer to the below image for better clarification.

To enable the Usage Statistics Plugin:
Go to Settings > Website > Plugins
Under Generic Plugins, check the box on the right of the Usage Statistics Plugin.
To configure the Usage Statistics Plugin:
Go to Settings > Website > Plugins
Under Generic Plugins, find the Usage Statistics Plugin
Click on the blue arrow on the left of the Usage Statistics Plugin to expand the links below the plugin.
Click on Settings
Scroll to the bottom of the pop-up box labeled Statistics Display Options
Check the box next to the Display submission statistics chart for the reader
You can opt to display the statistics as a bar or line graph and select the number of months to display usage for
Click on Save

Points to keep in mind
- The plugin is reset at the start of the year, and statistics for 12 months can be displayed at most.
- The statistics show the number of times an article has been downloaded.
Google Analytics Plugin
This can be a helpful plugin to analyze data in the Open Journal System 3.3.
This can be activated or configured by hovering over Settings, clicking on Plugins, and the Google Analytics plugin can be found in the list. The user may either enter ‘Google Analytics’ in the search bar or scroll down the list of generic plugins.
Place a check in the box to the right of the plugin. A blue arrow will appear on the left. Click to expand options and reveal a blue settings link. Click on settings.
To use this plugin, the user must have a Google Analytics account. (Users can click on the Google Analytics Site link in this window to create a new account)
Enter the Google Analytics account number in the box. It could take up to 24 hours before this is reflected on the website and Google Analytics to begin reporting data.
Tools
The tools menu can be accessed on the left side of the OJS dashboard. This section covers how to use these tools and explains their functions.

Import & Export Tools
This function allows users to extract data out of the OJS, or enter article data. It is also possible to export to some third-party systems such as the DOAJ or PubMed.

There is an option to export user data in XML format. Data and reports can be downloaded in CSV format by going to Statistics>Users.
Quick Submit Plugin
This allows you to add entire submissions to an issue. This is ideal if editors prefer to bypass the traditional path that involves reviewing and then editing before submitting.
It can be used as explained below:
- Journals that are published or displayed in OJS without the editorial workflow.
- In the event a conversion tool is not available when transferring journals published on other platforms to OJS.
- For originally printed journals that have been digitized.
To use this plugin, the user must have Editor or Journal Manager Permission levels and have the files ready to be published, including Metadata.
To enable the plugin or check if the plugin is enabled or installed, follow the steps below.

Go to Settings > Website > Plugins
Look under Installed Plugins. If the Quick Submit Plugin is in the list, skip to step 8. If you see it listed, skip to step 8. This means the plugin has been installed
If the Quick Submit Plugin is not under Installed Plugins, go to the Plugin Gallery tab.
Click on Quick Submit
Click on Install in the box that pops up.
(If the Install button is there, the Administrator of the site will have to install the plugin)
Confirm the action, then click OK and allow the installation to complete
After the plugin has been installed, go back to the Installed Plugins tab and check to see if the Quick Submit Plugin is now visible, meaning it is successfully installed
Check the box to the right of the Quick Submit Plugin to enable the plugin

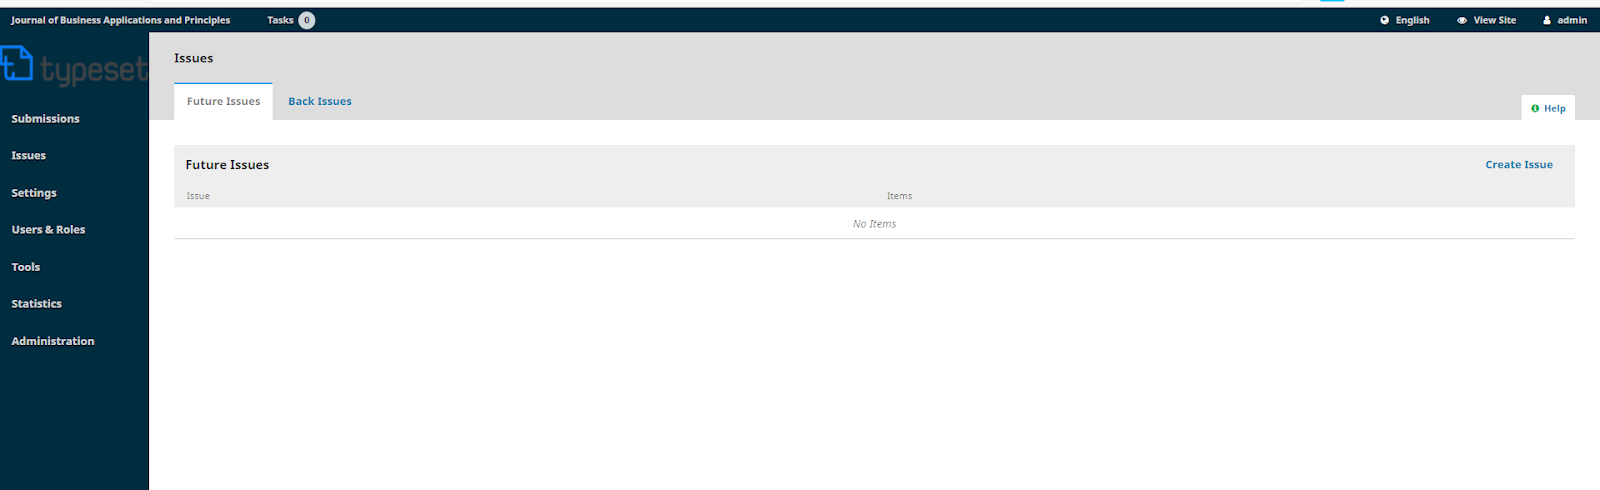
Once it has been confirmed that the plugin is installed and enabled, an issue needs to be created. This will contain the articles that are being imported.
- Go to Issues > Future issues and then Create Issue.
- Enter the relevant metadata
- If the issue has already been published, you can check the Published box
- Click on Save
- Repeat until all desired issues have been created
Once that is done, articles can be imported using the plugin. Follow the steps below:
- Go to Tools > Import/Export and select Quick Submit Plugin
- An optional cover image can be uploaded here by clicking on the Upload button
- Select the desired section of the journal from the Section dropdown
- Fill in all the required metadata fields
- (To configure metadata fields go to Workflow Settings > Submission > Submission Metadata)
- Click on Add Contributor to enter the names of authors and other contributors
- Under Galleys, click Add Galley to upload a PDF file
- Enter the Galley Label and language in the popup box
- Click on Save
- Select the Article Component and upload the file in the following pop up box
- At the end of the Quick Submit Plugin form, select if the article should be published immediately or remain unpublished for the time being.
- If Published has been chosen, the date published and the issue it is to be published in should be selected.
- Page number and permissions information can also be entered
- Once finished, click on save.

Note: Digital Object Identifiers are not added when using the Quick Submit Plugin.
To assign new DOIs to articles, follow the steps below:
- Enable and configure DOI plugin
- Once an article has been submitted using the Quick Submit plugin, click on Go to Submission to open the article’s submission record. It is also possible to go to the article’s submission record via the Submissions dashboard.
- Open Metadata on the top right of the window and then the Identifiers tab. A preview of the DOI to be assigned will be seen with a checked box next to Assign the DOI to this article.
- Click Save to assign the DOI
Follow these steps to add existing DOIs that have already been assigned to articles:
- Enable the DOI plugin
- Configure the DOI plugin to enter an individual DOI suffix for each published item
- Once an article has been submitted using the Quick Submit plugin, click on Go to Submission to open the article’s submission record. It is also possible to go to the article’s submission record via the Submissions dashboard.
- Click on Metadata found at the top right and then to the Identifiers tab
- Enter the assigned DOI suffix
- Click on Save and then Save again to assign the DOI
If it is required to designate the articles through new DOIs, then:
- Make sure the DOI plugin is properly configured and active.
- Go to Submissions Dashboard> Article Submission Record.
- On the top right go to Metadata>Identifiers. You will find a preview of the DOI that is to be assigned. Additionally, click on the check box right next to it stating “Assign the DOI to this article.”
- Click on the Save Button and the assigned DOI will come into effect.
Important Note: If DOIs are tasked with a default pattern, ensure that the DOI plugin is reconfigured to meet your requirements after adding DOIs to articles uploaded with the Quick Submit plugin.
Reset Article Permissions Tool
Reset Article Permissions is a tool that allows the user to reset the copyright statement and license information of published articles. This will revert everything to your journal’s default settings.

Consult a legal advisor before using this tool to ensure no breaches if what rights are held are not clear.
This can be found under the tab labeled Permissions in Tools. There is a Reset Article Permissions button below the explanation.
Manage Subscriptions
The OJS 3.X has a subscriptions feature that can be enabled. Administrators or those with access can restrict specific content or all the content of the journal.
To make changes go to Settings on the left of the dashboard and then Distribution>Access.
This section covers how to manage subscriptions and delves into details of how this feature can be used.

Subscription Policies
This is where Subscription Policy details that your subscribers see are entered and managed.
- Subscription Manager: Enter the details of the assigned person here
- Subscription Information: Clear subscription policy details are to be added here that will be displayed on the website
- Subscription Expiry: Enter the information here and restrict or allow access to past subscribers
- Subscription Expiry Reminder: Configure automated renewal reminders
- Online Payment Notifications: This allows the Subscription Manager to be notified of any payment related activity
- Open Access Options for Subscription Journals: Select the duration of restricted access if required. Older content will be made available automatically.
Subscription Types
This is where the types of subscriptions that the journal offers its subscribers are allotted.

Offering individual subscriptions and different institutional subscription rates are common. Special offers can be given to select organizations or their members/students. OJS has inbuilt functions that assist with the management of print and online subscriptions.
Different types of subscriptions may be created with varying access or durations.
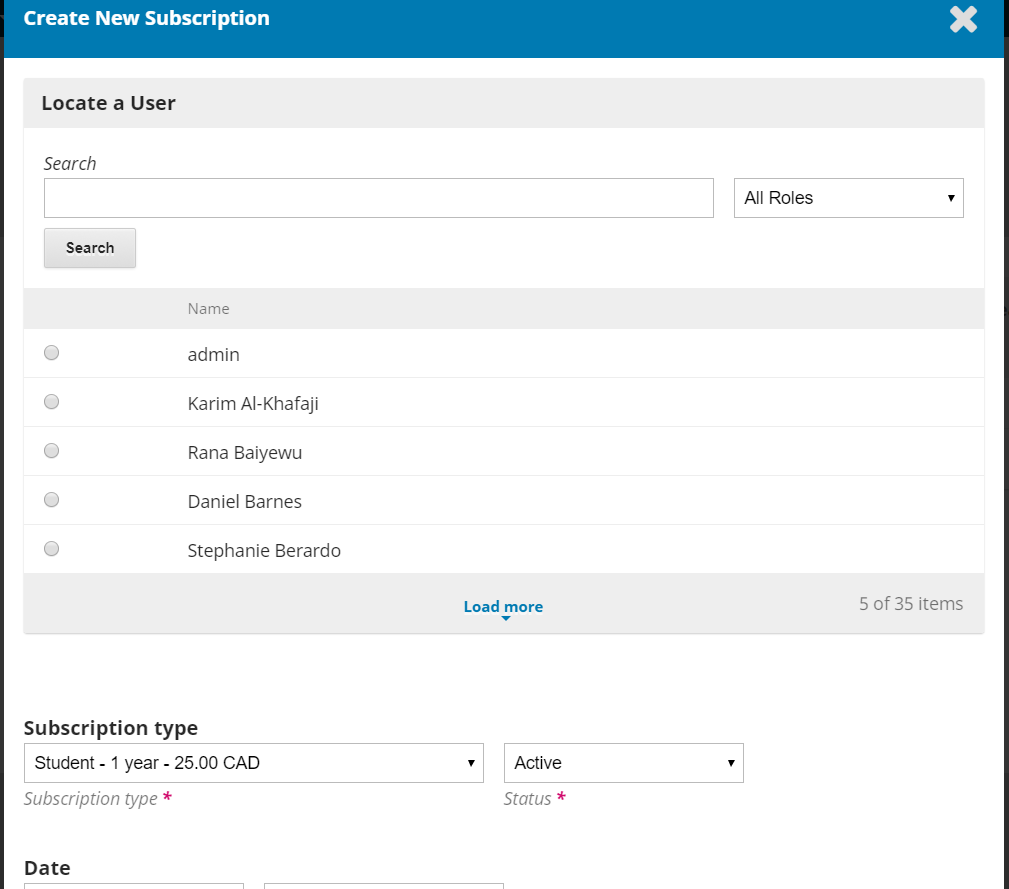
To add a new subscription type, go to Create New Subscription, the third option in the subscriptions window.
The parts of the form are explained below:
Name of Type: A subscription name may be entered her, e.g., name of institution or student
Description: A description of what the subscription entails can be entered here for display on the website
- Cost: Desired currency and amount can be entered here
- Format: Choose the appropriate format, e.g., online, offline
- Duration: The duration of the subscription is to be entered here
- Subscriptions: Select whether this particular subscription covers individuals or institutions
- Options: Select the appropriate options if required
Payment Types
To set the type of payment, go to Settings>Distribution>Payments. Select desired currency and payment method (debit/credit card or other online methods).

The different types of fees to be charged for varying access levels can be set under the Payment Types tab.
a) Author Fees
If an article processing fee is charged to authors, the amount can be entered in Author Fees. This function, once enabled, will allow requests for article processing charges once the review process is finished.

An editor can opt to request payment after (or when) accepting an article. The author will get a notification in OJs and email that will direct them to the payment gateway.
Author notification settings are available in Settings > Distribution > Payments, payment method, and details are to be entered here to enable the option to notify authors.
b) Reader Fees
To charge for individual articles and issues, the cost can be entered here.
To apply fees to PDF files, check the box next to Only Restrict Access to PDF version of issues and articles.
An issue galley has to be uploaded to be able to sell one.
c) General Fees
This option can be used to deploy and charge other fees, such as membership fees.
Payments
Any payments made through PayPal are recorded and listed under the Payments tab.
Individual Subscriptions
Details about individual subscriptions are listed here. This encompasses all the different types of individual subscriptions made available.
New individual subscriptions can be created here by using the Create New Subscription link on the right side.

A new account has to be created for the individual under Users & Roles (refer to Users & Roles, mentioned earlier) before it is configured and a new subscription is created.
Read the following to understand how to configure Individual Subscriptions
- Subscription Type: Select what type of subscriber this is
- Status: Choose whether the subscription is active or not
Refer to Subscription Types for any clarification, if required. - Date: Set the subscription timeframe
- Membership: Optionally add any relevant membership information
- Reference Number: Either create unique subscriber reference numbers or enter the invoice or bill number
- Notes: Optionally, any important notes and information can be added here
Institutional Subscriptions
Just as individual subscriptions are managed, Institutional Subscriptions are organized here. Some examples of institutions could be research institutes, libraries, colleges or universities, subscriber’s names, and other organizations that have subscribed.

The institution’s contact person must have an account created for them under Users & Roles before a new subscription is created by clicking on the Create New Subscription link.
As is with managing individual subscriptions, these can be configured and managed here.

- Subscription Type: Select the type of subscribers, such as library or college
- Status: Select whether the subscription is active or inactive
- Date: Select the subscription time frame and expiry
- Institution: Enter the name of the institution
- Mailing Address: Address information can be entered here
- Domain: Readers from a specified domain name will have access.
- IP Ranges: Enter each IP range as a new line. Readers within the specified IP range will have access.

- Notes: Add desired optional notes here
Payment Notifications
a) Manual payment notifications
The subscription manager is notified through an email about any payments made. These manual subscriptions will also be recorded under the tab Payment > Individual / Institutional tab.
The subscription manager can enter the status here.

This window shows the name of the subscriber, their email address, type of subscription, payment status, and duration of the subscription.
Test emails do not work as the Sandbox is restricted from sending emails.
The PayPal administrator will be notified when a payment is made via PayPal. OJS also records it under the Payment tab in Payments > Payment.
Subscription Block
When a subscriber is accessing content on the Open Journal System, the access provider's information can be displayed on the sidebar.
This feature can be managed by going to Website Settings > Appearance > Sidebar Management.
Setting Articles as Open Access
OJS allows users the option of setting desired articles to Open Access. Which means a subscription is not required to view them.

To create open access articles, go to Issues on the left of the dashboard. It is also possible to set it to Open Access before the issue is published by clicking on the Future tab, then clicking on the blue arrow beside the issue.
Under the Table of Contents, articles to be Open Access can be selected by checking the box.
Pro Tips:
Securing OJS:
It is always best to use versions of the Open Journal System downloaded from the official website. There are many plugins available. Again it is advisable to download plugins from the official website.
When upgrading to a newer version of the OJS, it may be advisable to wait until a stable version is released. Most bugs would be fixed, and feedback about usage and issues would have been incorporated or fixed.
It is always a good idea to regularly back up OJS data. Depending on the amount of data entered into the journal, it may be advisable to back it up once a week.
While there is always room for nefarious activity, it is best to limit the chance of hackers or ill-intending individuals. Learning how to block access for injected scripts could prove helpful.
Making sure your website is secure is also crucial, especially when payment activities take place.
Sneak Peek into Final Chapter 3 of the A-Z of OJS 3.x
The next and the final chapter will provide you the details over authoring, reviewing, production and publication. Chapter 3 will encompass the complete details about assigning job roles and managing the entire editorial workflow for better and efficient management of the OJS platform. In addition, the 3rd chapter of our OJS user guide will walk you through the process of user account management, where you will learn how to reset your password, configure your journal profile and register & configure your journal.
Read Chapter 3 of The A-Z of Open Journal Systems (OJS) here.
Just in case you want to learn more about SciSpace's research solution suite, check out our product page to find out how our products can simplify your research workflows so that you can concentrate on advancing science.

The best-in-class solution takes care of everything from literature search and discovery, profile management, research writing and formatting, and so much more.
Reference: PKP Docs - Learning OJS 3.x


![Plagiarism in Research — The Complete Guide [eBook]](/resources/content/images/size/w1000/2022/08/What-is-Plagiarism-The-Complete-Guide.jpg)